Ansible 是一款实现自动化运维管理的工具。能够快速一键的为大量的集群统一的管理自动化工作。Ansible 基于 python 开发,集合了众多运维工具(puppet、cfengine、chef、func、fabric)的优点实现了批量系统配置、批量程序部署、批量运行命令等功能。而且Ansible没有客户端。第三方中文权威指南:
Ansible中文权威指南- 国内专业的Ansible中文官方学习手册
Ansible前置
YAML语言
Ansible 配置文件使用的是 YAML 语言。YAML 的配置文件后缀为 .yml。且有这些特点:大小写敏感;使用缩进表示层级关系;缩进不允许使用tab,只允许空格;缩进的空格数不重要,只要相同层级的元素左对齐即可。学会下面这篇教程,对于 Ansible 来说你的 YAML 语言水平就足够了。
Ansible管理主机
Ansible 需要 python 运行环境所以 Ansible 管理主机需要 python 环境。而且 Windows 系统不能作为 Ansible 管理主机。
Ansible节点
Ansible 默认通过 SSH 协议管理机器,这也是 Ansible 不需要客户端的原因。管理主机和节点之间的文件传输默认使用的是 sftp。如果 sftp 不可用,可在 ansible.cfg 配置文件中配置为 scp 方式传输。
Ansible 节点也需要安装 python 环境。
Ansible安装
Ansible 的安装方式多种多样:源码安装,yum安装,apt安装,pkg安装,pip安装等等。我们在安装时选择合适的安装方式进行安装即可。
我示例的操作系统为 Ubuntu 24.04 所以我使用方便的 apt安装。
sudo apt install -y ansible && ansible --version如果你是 CentOS 则还要安装 "epel-release" 才能使用 yum 安装 Ansible。
sudo yum install -y epel-release
sudo yum install -y ansible && ansible --version
Ansible 版本为 2.16.3,同时 python 版本必须在 python 2.6 以上,我的 python 版本为 3.12.3。
ansible [core 2.16.3]
  config file = /etc/ansible/ansible.cfg
  configured module search path = ['/root/.ansible/plugins/modules', '/usr/share/ansible/plugins/modules']
  ansible python module location = /usr/lib/python3/dist-packages/ansible
  ansible collection location = /root/.ansible/collections:/usr/share/ansible/collections
  executable location = /usr/bin/ansible
  python version = 3.12.3 (main, Apr 10 2024, 05:33:47) [GCC 13.2.0] (/usr/bin/python3)
  jinja version = 3.1.2
  libyaml = True
Ansible节点控制
Ansible默认通过 /etc/ansible/hosts 获取 Ansible 节点信息。hosts 文件里存放的是组和主机。列如:
[nginx]    #组名
frp.happlelaoganma.cn #主机IP或域名,一个组下可以存在多个主机
[v2ray]
vps.happlelaoganma.cn
[mc]
mc.happlelaoganma.cn
Ansible 会读取 hosts 文件中的配置,然后进行 SSH 连接管理。默认连接时是需要我们输入 SSH 密码的。但是我们实际在使用中往往不会一个一个的去输入密码进行连接,而是配置 SSH 密钥进行密钥认证,实现免密码 SSH 连接。
SSH密钥认证
SSH 配置密钥认证网上也有很多教程,我这里简单演示一下。
root@home:~# ssh-keygen -t rsa #输入后,一直回车就行
执行完后,会在 ~/.ssh/ 下生成对应的密钥文件(id_rsa、id_rsa.pub)
root@home:~/.ssh# ls
authorized_keys  id_rsa  id_rsa.pub
然后我们需要将公钥(id_rsa.pub)写入节点服务器的 ~/.ssh/authorized_keys 文件中,实现密钥认证。使用 "ssh-copy-id" 指令可以方便配置。
root@home:~/.ssh# ssh-copy-id root@frp.happlelaoganma这里还是写一下 "ssh-copy-id" 指令的端口问题。如果节点的 SSH 服务不是使用的22端口,那么 "ssh-copy-id" 通常是不能完成工作的。我们需要去修改一下本机 SSH 默认连接端,把它改为节点服务器的 SSH 端口。
root@home:~/.ssh# vim /etc/ssh/ssh_config
进入 /etc/ssh/ssh_config 文件下进行修改,这里就不做演示了,如果这都不会那么你现在不应该看这篇文章。
Ansible连接测试
通过 ansible all -m ping 指令进行节点连接测试。
root@home:~# ansible all -m ping
frp.happlelaoganma.cn | SUCCESS => {
    "ansible_facts": {
        "discovered_interpreter_python": "/usr/bin/python3"
    },
    "changed": false,
    "ping": "pong"
}
mc.happlelaoganma.cn | SUCCESS => {
    "ansible_facts": {
        "discovered_interpreter_python": "/usr/bin/python"
    },
    "changed": false,
    "ping": "pong"
}
vps.happlelaoganma.cn | SUCCESS => {
    "ansible_facts": {
        "discovered_interpreter_python": "/usr/bin/python3"
    },
    "changed": false,
    "ping": "pong"
}
root@home:~#
注意如果测试没通过的话大概率有这几种情况:
ping测试不通过,管理主机连接不上节点
云服务器防火墙,本地防火墙没放通22端口。
Ansible节点SSH端口不为22端口
Ansible节点 SSH 端口不为22端口。可以通过修改 hosts 文件进行指定节点 SSH 的连接端口。例如:
#下面两种定义端口方式都可行
[nginx]
frp.happlelaoganma.cn:333
[v2ray]
vps.happlelaoganma.cn ansible_ssh_port=333
[mc]
mc.happlelaoganma.cn ansible_ssh_port=444
当然修改 SSH 端口后,对应的也需要在防火墙中放行对应的端口。
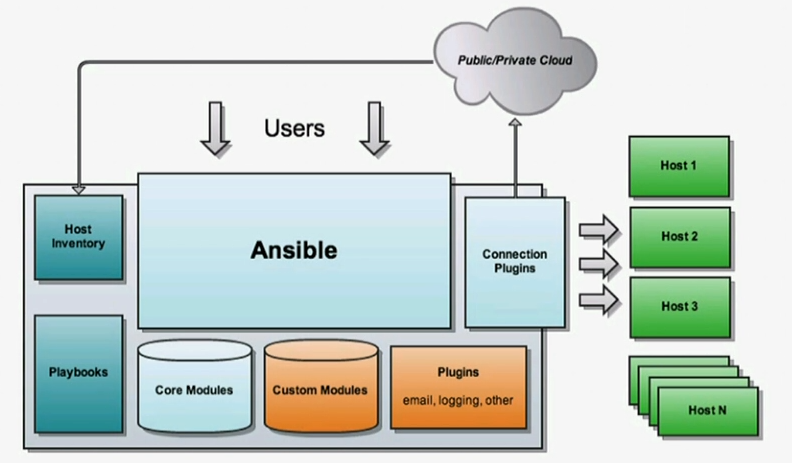
Ansible命令执行过程
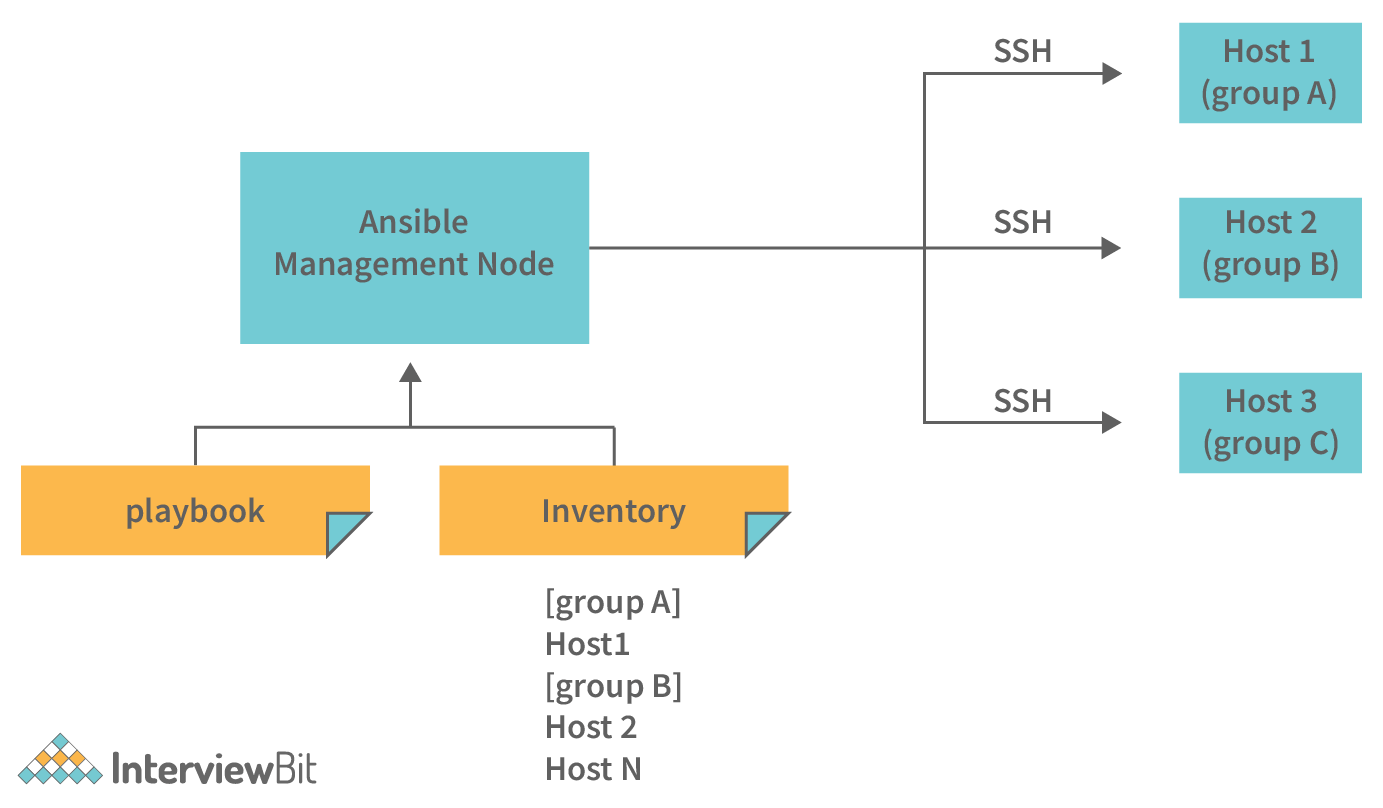
上面是在网上找的一张 Ansible 工作原理图。playbook 的意思是剧本,Inventory 的意思是主机清单。Ansible 会按照 playbook 中所写的配置进行工作。
1.加载ansible配置文件,默认为/etc/ansible/ansible.cfg
2.查找主机配置文件,默认为/etc/ansible/hosts
3.加载对应的模块文件
4.通过ansible将模块或命令生成对应的临时py文件,并将该文件传输至远程节点
5.对应执行用户家目录的.ansible/tmp/XXX/XXX.py文件
6.给文件添加执行权限
7.执行并返回结果
8.删除临时py文件,退出
Inventory
Inventory 是主机清单,默认为 /etc/ansible/hosts 文件。里面可以定义主机和组还有各种变量。
主机和组
Ansible默认通过 /etc/ansible/hosts 获取 Ansible 节点信息。hosts 文件里存放的是组和主机。列如:
[nginx]    #组名
frp.happlelaoganma.cn #主机IP或域名,一个组下可以存在多个主机
[v2ray]
vps.happlelaoganma.cn
[mc]
mc.happlelaoganma.cn
通过分组的形式,可以方便我们对不同服务类型的主机进行统一管理。
root@home:~/.ssh# ansible nginx -m ping
frp.happlelaoganma.cn | SUCCESS => {
    "ansible_facts": {
        "discovered_interpreter_python": "/usr/bin/python3"
    },
    "changed": false,
    "ping": "pong"
}
变量
之前在给节点主机更改 SSH 端口时使用的 "ansible_ssh_port" 就是变量的其中之一,ansible 的变量不仅可以作用于主机还可以在组中使用。
[nginx]
frp.happlelaoganma.cn

#[组名:vars]
[nginx:vars]
ansible_ssh_port=333
root@home:/etc/ansible# ansible nginx -m ping
frp.happlelaoganma.cn | SUCCESS => {
    "ansible_facts": {
        "discovered_interpreter_python": "/usr/bin/python3"
    },
    "changed": false,
    "ping": "pong"
}
可以使用 "[ ]" 指定变量范围。"[1:50]"、"[a:f]" 等。例如表示50个主机。
[nginx]
frp[1:50].happlelaoganma.cn
我们还可以自定义变量。
host: 1.1.1.1并使用 "{{变量名}}" 在其他地方引用它,使用双花括号主要是为了和
子分组
可以把一个组作为另一个组的子成员,以及分配变量给整个组使用。这些变量可以给 /usr/bin/ansible-playbook 使用,但不能给 /usr/bin/ansible 使用。
[nginx]
frp.happlelaoganma.cn:333
[v2ray]
vps.happlelaoganma.cn ansible_ssh_port=333
[mc]
mc.happlelaoganma.cn ansible_ssh_port=444

[port333:children]
nginx
v2ray

[server:vars]
ansible_ssh_port=333
分文件定义Host和Group的变量
直接在 Inventory 主文件中定义所有的变量是一种不好的方式。可以把主机变量和组变量区分开来,分别存放在 host_vars 和 group_vars 目录中。列如:
/etc/ansible/host_vars/frp
/etc/ansible/group_vars/nginx
/etc/ansible/group_vars/mc
这些独立文件的格式为 YAML,且不需要后缀比如 .yml。
模块
模块("task plugins"或"library plugins")是在 Ansible 中实际执行的。模块可以在 Playbooks 任务中执行,也可以通过 ansible 命令来执行。
每个模块都能接受参数,几乎所有的模块都接受键值对(key=value)参数,空格分隔。一些模块不接受参数,只需在命令行输入相关命令就能调用。
在 Ansible 命令中使用 "-m" 来调用模块,比如我们之前测试节点连接时使用的 "ping" 模块。
root@home:~/.ssh# ansible nginx -m ping
使用 "ansible-doc l" 命令可以查看本机上已经安装的模块。
root@home:~/.ssh# ansible-doc l使用 "ansible-doc [模块名]" 可以查看对应模块的帮助手册。
root@home:~# ansible-doc ping由于 Ansible 模块众多,我下面只介绍几个常用的模块。
command模块
command 模块能够在远程主机上执行命令,且 command 模块是默认模块,可以忽略 -m 选项。但是不支持管道符、重定向符号。
# "-a"用来指定模块的参数
root@home:~# ansible all -m command -a 'date'
frp.happlelaoganma.cn | CHANGED | rc=0 >>
Tue Jun 11 10:28:41 AM CST 2024
root@home:~# ansible all -a 'date'
frp.happlelaoganma.cn | CHANGED | rc=0 >>
Tue Jun 11 10:29:00 AM CST 2024
shell模块
shell 模块和 command 模块类似,都是在远程主机执行命令,但是 shell 模块相当于调用远程主机的 shell 进程,然后在 shell 进程下开一个子 shell 允许命令。所以 shell 模块支持管道符、重定向符号等。
root@home:~# ansible all -m shell -a 'cat /etc/passwd | grep root'
frp.happlelaoganma.cn | CHANGED | rc=0 >>
root:x:0:0:root:/root:/bin/bash
cron模块
cron 模块实现定义远程主机的计划任务。cron 模块的参数可以通过 "ansible-doc cron" 进行查看。
root@home:~# ansible all -m cron -a 'hour=23 job="/usr/bin/cp -f /etc/hosts /tmp" name="cp"'
frp.happlelaoganma.cn | CHANGED => {
    "ansible_facts": {
        "discovered_interpreter_python": "/usr/bin/python3"
    },
    "changed": true,
    "envs": [],
    "jobs": [
        "cp"
    ]
}
如果需要移除 cron 模块的这个配置,可以在参数中加上 "state=absent" 表示移除。默认 "state=present" 表示添加。
root@home:~# ansible all -m cron -a 'name="cp" state=absent'
frp.happlelaoganma.cn | CHANGED => {
    "ansible_facts": {
        "discovered_interpreter_python": "/usr/bin/python3"
    },
    "changed": true,
    "envs": [],
    "jobs": []
}
"state" 参数在许多模块中都适用。
copy模块
copy 模块能实现批量文件拷贝的功能。例如:
root@home:~# ansible all -m copy -a 'src=/etc/hosts dest=/tmp/test.txt'
# "-a"用来指定模块的参数
# "src"代表的是要拷贝的源文件
# "dest"代表的是拷贝后的目标文件
拷贝成功后,文件的所有人和所属组都为执行用户,默认权限为 "0644"。
root@home:~# ansible all -m copy -a 'src=/etc/hosts dest=/tmp/test.txt'
frp.happlelaoganma.cn | CHANGED => {
    "ansible_facts": {
        "discovered_interpreter_python": "/usr/bin/python3"
    },
    "changed": true,
    "checksum": "9c75737d719ea55f9fc0a6619344e622f57574da",
    "dest": "/tmp/test.txt",
    "gid": 0,
    "group": "root",
    "md5sum": "a620a2c9e74f5d45a16fe39bcbd71edc",
    "mode": "0644",
    "owner": "root",
    "size": 228,
    "src": "/root/.ansible/tmp/ansible-tmp-1718070545.7344937-397461-127990255525762/source",
    "state": "file",
    "uid": 0
}
copy 模块可以在拷贝的时候更改文件权限,只需要我们添加参数。同时由于我们对源文件做了更改(这里是权限更改),当我们再去拷贝时默认会覆盖之前的目标文件。如果需要保留之前的目标文件并重新生成一个新的目标文件我们需要使用 "backup" 参数。
root@home:~# ansible all -m copy -a 'src=/etc/hosts dest=/tmp/test.txt owner=root group=root mode=777 backup=yes'
frp.happlelaoganma.cn | CHANGED => {
    "ansible_facts": {
        "discovered_interpreter_python": "/usr/bin/python3"
    },
    "changed": true,
    "checksum": "9c75737d719ea55f9fc0a6619344e622f57574da",
    "dest": "/tmp/test.txt",
    "gid": 0,
    "group": "root",
    "mode": "0777",
    "owner": "root",
    "path": "/tmp/test.txt",
    "size": 228,
    "state": "file",
    "uid": 0
}
了解了基本的模块后,后面的模块学起来就容易很多了。下面对于模块的基本操作就不会再过多的赘述了。
fetch模块
fetch 模块用来从远程主机获取文件到本地服务器。
root@home:~# ansible all -m fetch -a 'src=/etc/hosts dest=/root'
root@home:~# ls
frp.happlelaoganma.cn  mc.happlelaoganma.cn  snap  vps.happlelaoganma.cn
root@home:~# tree
.
├── frp.happlelaoganma.cn
│   └── etc
│       └── hosts
├── mc.happlelaoganma.cn
│   └── etc
│       └── hosts
└─── vps.happlelaoganma.cn
    └── etc
        └── hosts
user模块和group模块
user 模块和 group 模块可以对系统中的用户和组进行操作,更多参数可以通过 "ansible-doc" 了解学习。
root@home:~# ansible all -m user -a 'name=test'
root@home:~# ansible all -m group -a 'name=test1'
软件包(apt/yum)模块
软件包模块使用 yum/apt 在远程主机上安装与卸载软件包。
root@home:~# ansible all -m apt -a 'name=vim state=abasent' #卸载
root@home:~# ansible all -m apt -a 'name=vim' #安装
服务(systemd/service)模块
服务模块用于远程管理主机上的服务。
root@home:~# ansible all -m service -a 'enable=true name=ssh state=restarted'
Playbooks
Playbooks 意为 "剧本",Playbooks 的格式为 YAML。Playbooks 由一个或多个 "Play" 组成,Playbooks 是一个以 "palys" 为元素的列表。
"Play" 是由两部分组成的,作用角色(hosts)和执行任务(tasks),一个任务是对一个模块的调用。Playbooks 剧本会指导演出角色在不同的场景下做什么事情。
下面是一个 安装运行 SSH 服务的 Playbooks。
- hosts: nginx
  tasks:
  - name: instll ssh
    apt: name=ssh
  - name: start ssh service
    systemd: name=sshd state=started
其中的格式由 YAML 语言要求,"hosts" 为角色,"tasks" 为任务清单。"name" 是一个任务的描述,下面一行语句为模块的调用。
执行一个 Playbook 的指令如下,其中 "-f" 代表的是并发执行的 SSH 进程数。这意味着同一时间最多在10台远程主机上执行。默认的 "-f" 参数为5。
root@home:~# ansible-playbook ssh.yml -f 10
command和shell模块
在 Playbooks 中 command 模块和 shell 模块是两个特殊的模块。它们不使用键值对(key=value)格式,而是直接调用命令。
tasks:
  - name: cat /etc/hosts
    command: cat /etc/hosts

tasks:
  - name: cat /etc/hosts
    shell: cat /etc/hosts
学到这,我们就已经可以使用 Ansible 做一些简单的自动化工作了。但是在一个更复杂的项目面前,现在所学的内容是不能够帮助我们完成任务的。下一篇 Ansible 文章,我们将进入高级的 Playbooks 编写,并且我会在实际环境中搭建一个项目来测试我们的剧本。