最近项目上需要完成整个识别、定位、到最后的抓取流程。
分享一下,通过使用D435相机并结合Yolo V8识别出目标物体后,抠取出目标物体部分的有效深度图,最后将前景物体部分的RGB
D435相机结合Yolo V8识别出目标物体,并转点云出抓取位姿
1、D435相机取流
使用pyrealsense2进行RGB-D获取视频流,这里最大的坑其实就是每一帧得做一个RGB-D帧间的对齐。
import cv2
import numpy as np
import pyrealsense2 as rs

pipeline = rs.pipeline()
align_to = rs.stream.color
align = rs.align(align_to)
config = rs.config()
D400_imgWidth, D400_imgHeight = 640, 480
config.enable_stream(rs.stream.color, D400_imgWidth, D400_imgHeight, rs.format.bgr8, 30)
config.enable_stream(rs.stream.depth, D400_imgWidth, D400_imgHeight, rs.format.z16, 30)

profile = pipeline.start(config)

while True:
    frames = pipeline.wait_for_frames()
    # RGB-D对齐
    aligned_frames = align.process(frames)
    aligned_color_frame = aligned_frames.get_color_frame()
    aligned_depth_frame = aligned_frames.get_depth_frame()

    if not aligned_depth_frame or not aligned_color_frame:
        raise Exception("[info] No D435 data.")

    rgb = np.asanyarray(aligned_color_frame.get_data())
    d = np.asanyarray(aligned_depth_frame.get_data())

    if len(rgb):
        cv2.imshow("RGB", rgb)
        cv2.imshow("D", rgb)

        if cv2.waitKey(1) & 0xFF == ord("q"):
            break
2、D435结合Yolo V8实时检测
其实就是将D435的RGB流按照循环逐帧送进Yolo V8进行推理
from ultralytics import YOLO

model = YOLO(r"/train/weights/best.pt")
while True:
    frames = pipeline.wait_for_frames()
    aligned_frames = align.process(frames)
    aligned_color_frame = aligned_frames.get_color_frame()
    aligned_depth_frame = aligned_frames.get_depth_frame()

    if not aligned_depth_frame or not aligned_color_frame:
        raise Exception("[info] No D435 data.")

    rgb = np.asanyarray(aligned_color_frame.get_data())
    d = np.asanyarray(aligned_depth_frame.get_data())

    if len(rgb):
        results = model(rgb, conf=0.25)

        annotated_frame = results[0].plot()
        cv2.imshow("YOLOv8 Inference", annotated_frame)

        if cv2.waitKey(1) & 0xFF == ord("q"):
            break
3、扣取指定物体的深度图
3.1 扣取指定物体的mask
正常场景中只有一小部分是我们想要的,比如说一张桌面上有许多物件,但我只想识别、或者后期只抓绿色的杯子。那么就需要将Yolo V8检测出来的所有结果进行后处理,筛出我们想要的物体。
// An highlighted block
'''进行深度学习前向传播推理'''
results = model(color_img, conf=0.25)
# 封装后处理函数,只保留指定“input”的mask。
def backward_handle_output(results , color_img, depth_img, nc, input):
    center = None
    cls = []
    mapped_depth = None
    annotated_frame = output[0].plot()
    mask = None
    # 如果检测到物体,也就是mask不为空时
    if results [0].masks is not None:
        # 获取所有检测框所属的类别
        for cls_idx in range(len(output[0].boxes)):
            cls.append(output[0].names.get(int(output[0].boxes.cls[cls_idx].item())))
        # 只留下指定的“input”类别物体
        if input in cls:
            # 根据“input”对应的索引号,获取其mask
            cls_idx = cls.index(input)
            mask = np.array(output[0].masks.data.cpu())[cls_idx]
3.2 根据mask扣取物体有效深度部分
正常会通过深度图结合相机内参来转点云,所以如果我们只想要将我们待检测的物体部分的深度图转成点云图,那这样就可以过滤掉不相关的物体或背景。
# 判断非指定物体的有效区域
channel_zeros = mask == 0
'''初始化一个与原始深度图类型的一致的全0深度图'''
mapped_depth = np.zeros_like(depth_img)
'''也就是我们指定“input”物体mask区域对应的位置的深度信息抠出来,剩下非物体有效区域深度值全置为0'''
# 这样,我们就成功晒出了物体部分的深度值,其余全为背景0。
mapped_depth[~channel_zeros] = depth_img[~channel_zeros]
mapped_depth[channel_zeros] = 0
4、 结合相机内参转物体点云
import open3d as o3d
pcd = o3d.geometry.PointCloud()

def create_point_cloud_from_depth_image(depth, camera, organized=True):
    """ Generate point cloud using depth image only.

        Input:
            depth: [numpy.ndarray, (H,W), numpy.float32]
                depth image
            camera: [CameraInfo]
                camera intrinsics
            organized: bool
                whether to keep the cloud in image shape (H,W,3)

        Output:
            cloud: [numpy.ndarray, (H,W,3)/(H*W,3), numpy.float32]
                generated cloud, (H,W,3) for organized=True, (H*W,3) for organized=False
    """
    assert(depth.shape[0] == camera.height and depth.shape[1] == camera.width)
    xmap = np.arange(camera.width)
    ymap = np.arange(camera.height)
    xmap, ymap = np.meshgrid(xmap, ymap)
    points_z = depth / camera.scale
    points_x = (xmap - camera.cx) * points_z / camera.fx
    points_y = (ymap - camera.cy) * points_z / camera.fy
    cloud = np.stack([points_x, points_y, points_z], axis=-1)
    if not organized:
        cloud = cloud.reshape([-1, 3])
    return cloud

if mapped_depth is not None:
    mapped_depth = mapped_depth.astype(float) / 1000.0
    depth_img = depth_img.astype(float) / 1000.0

    mask_cloud = create_point_cloud_from_depth_image(mapped_depth, camera, organized=True)

    depth_range = [0.0, 1.5]
    mask = (depth_img < depth_range[1]) & (depth_img > depth_range[0])

    obj_cloud_masked = mask_cloud[mask]
    rgb_masked = color_img[mask] / 255

    idxs = np.random.choice(len(cloud_masked), 20000, replace=True)

    obj_cloud_sampled = obj_cloud_masked[idxs]
    rgb_sampled = rgb_masked[idxs]


    pcd.points = o3d.utility.Vector3dVector(obj_cloud_sampled.astype(np.float32))
    pcd.colors = o3d.utility.Vector3dVector(rgb_sampled.astype(np.float32))

    # 如果可视化的点云方向不正,可进行坐标系方向调整
    # obj_cloud_sampled[:, 1] = - obj_cloud_sampled[:, 1]
    # obj_cloud_sampled[:, 2] = - obj_cloud_sampled[:, 2]


    o3d.visualization.draw_geometries([pcd])
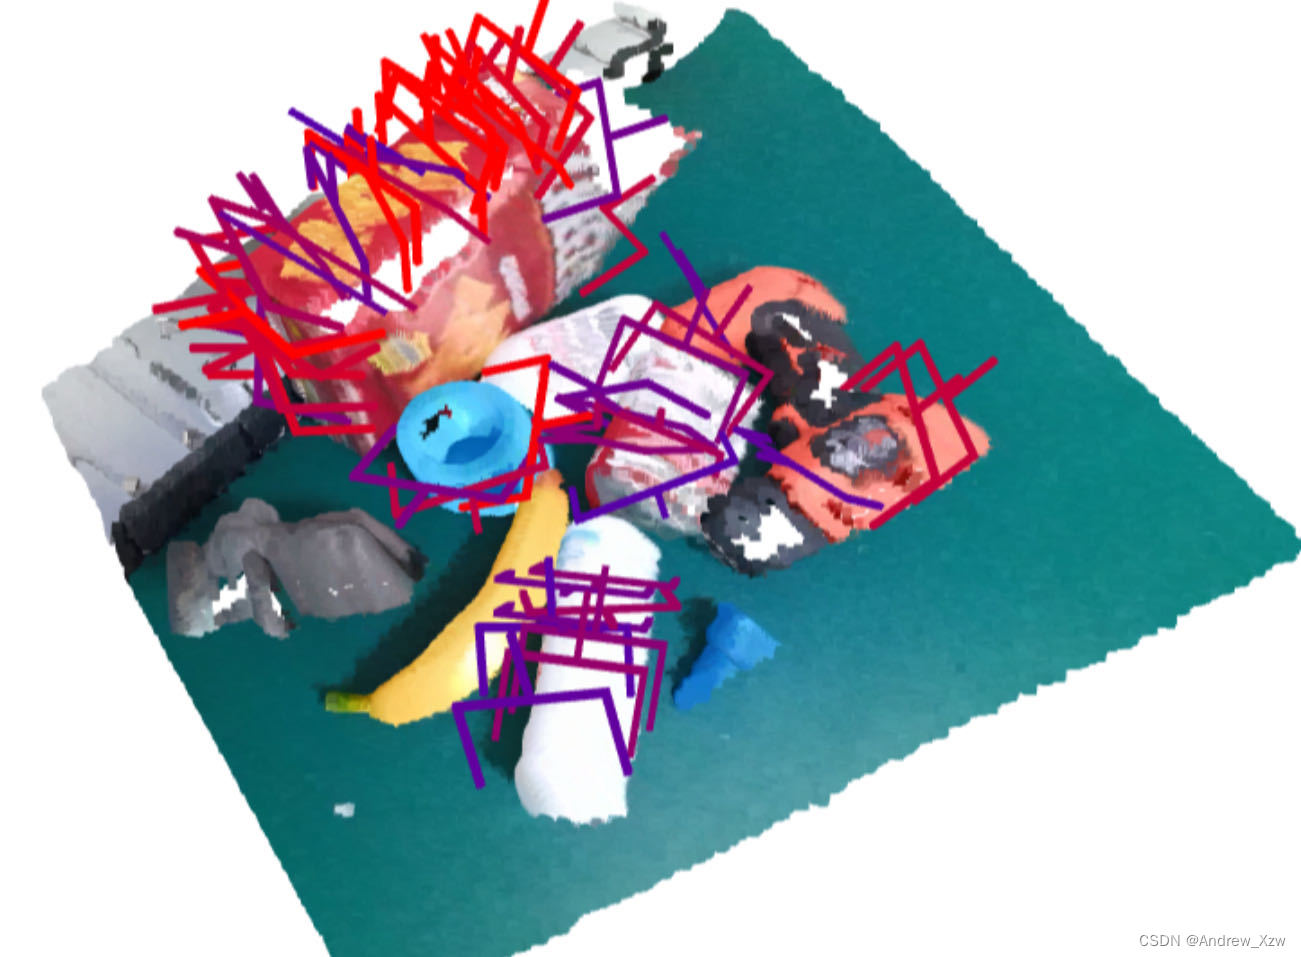
5、 抓取
如果相对整个场景进行感知抓取,而非指定单个物体,就可以把根据物体mask扣取深度图部分取消。进而,使用开源GraspNet、AnyGrasp等抓取网络进行抓取姿势预测。


![[数据集][目标检测]叶子计数检测数据集VOC+YOLO格式240张1类别](https://img-blog.csdnimg.cn/direct/d02585cac2d044e59a8ac7c8e5d5f8b8.png)